Paywerk Integration Portal
Download OpenAPI specification:Download

Paywerk in cooperation with Swedbank is offering Buy Now Pay Later (BNPL) and Pay Now payments. Payments are based only on debit or credit cards. Purchase full amount will be paid to merchant after order fulfilment. Overview of the transactions can be found in our merchant portal.
In order to start accepting Paywerk payments, please contact Swedbank.
At the current phase service is offered only to Estonian merchants.
New to Paywerk?
Paywerk does not sign agreements directly with merchants. Please contact Swedbank to start accepting Paywerk payments.
| Shopper country | Pay now (coming soon) | Pay in x days | Pay in x parts |
|---|---|---|---|
| Estonia | ✓ (coming soon) | ✓ (30 days - coming soon) | ✓ (3 parts) |
| Other EEA countries | ✓ (coming soon) | - | - |
Pay in x days and Pay in x parts are limited to the shopping cart amount range from 100 to 2000 EUR.
Please note that the ability to purchase with BNPL products depends on the shopper profile and the financier's risk assessment, and cannot be offered to everyone.
At this moment Paywerk operates only in Estonia. Through Swedbank Estonia an Estonian merchant can onboard to provide BNPL payments to Estonian shoppers.
| Merchant country | Shopper country | |
|---|---|---|
| Estonia | ✓ | ✓ |
| Other EEA countries | - | ✓ (Pay Now only) |
You can check the current and historical service status on our status page at status.paywerk.co.
API key is the single secret for communication between your server and Paywerk. There is no limit for the number of API keys. Since each merchant user can have multiple companies (legal entities) and multiple shops, please bare in mind that each API corresponds to the combination of one company and one shop. That also means that a single purchase can be related only to one company and one shop since it has to use one API key.
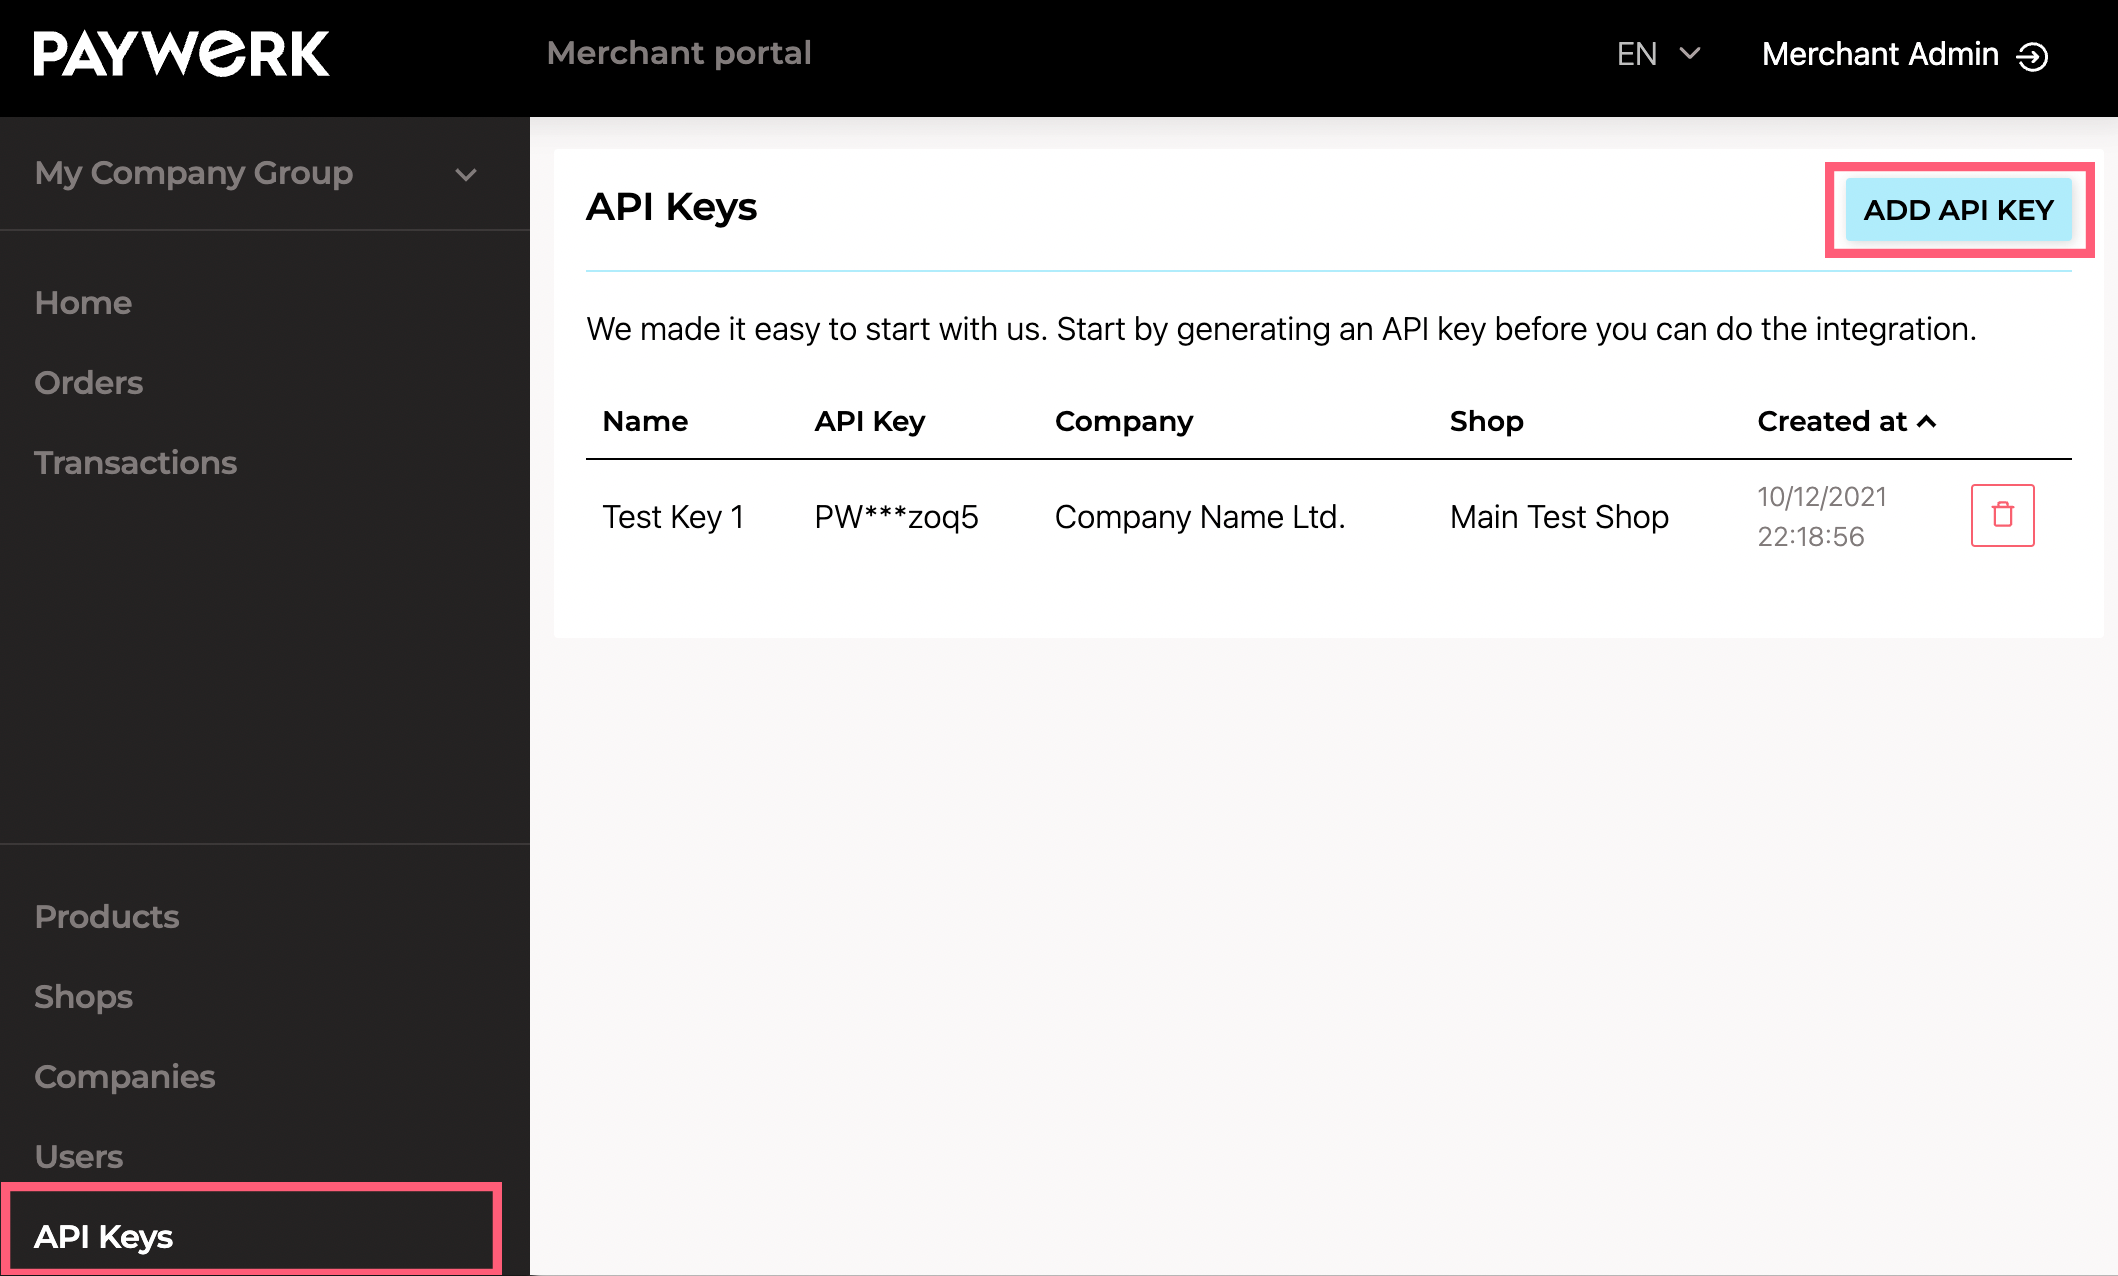
You can generate API keys in Merchant Portal:
Step 1. Find API keys menu. Open menu API keys and click Add API key button.
Step 2. Define scope of API key. Add a user-friendly and memorable name for the API key, especially if you plan to use multiple API keys. Choose the company and shop to which the API key corresponds.

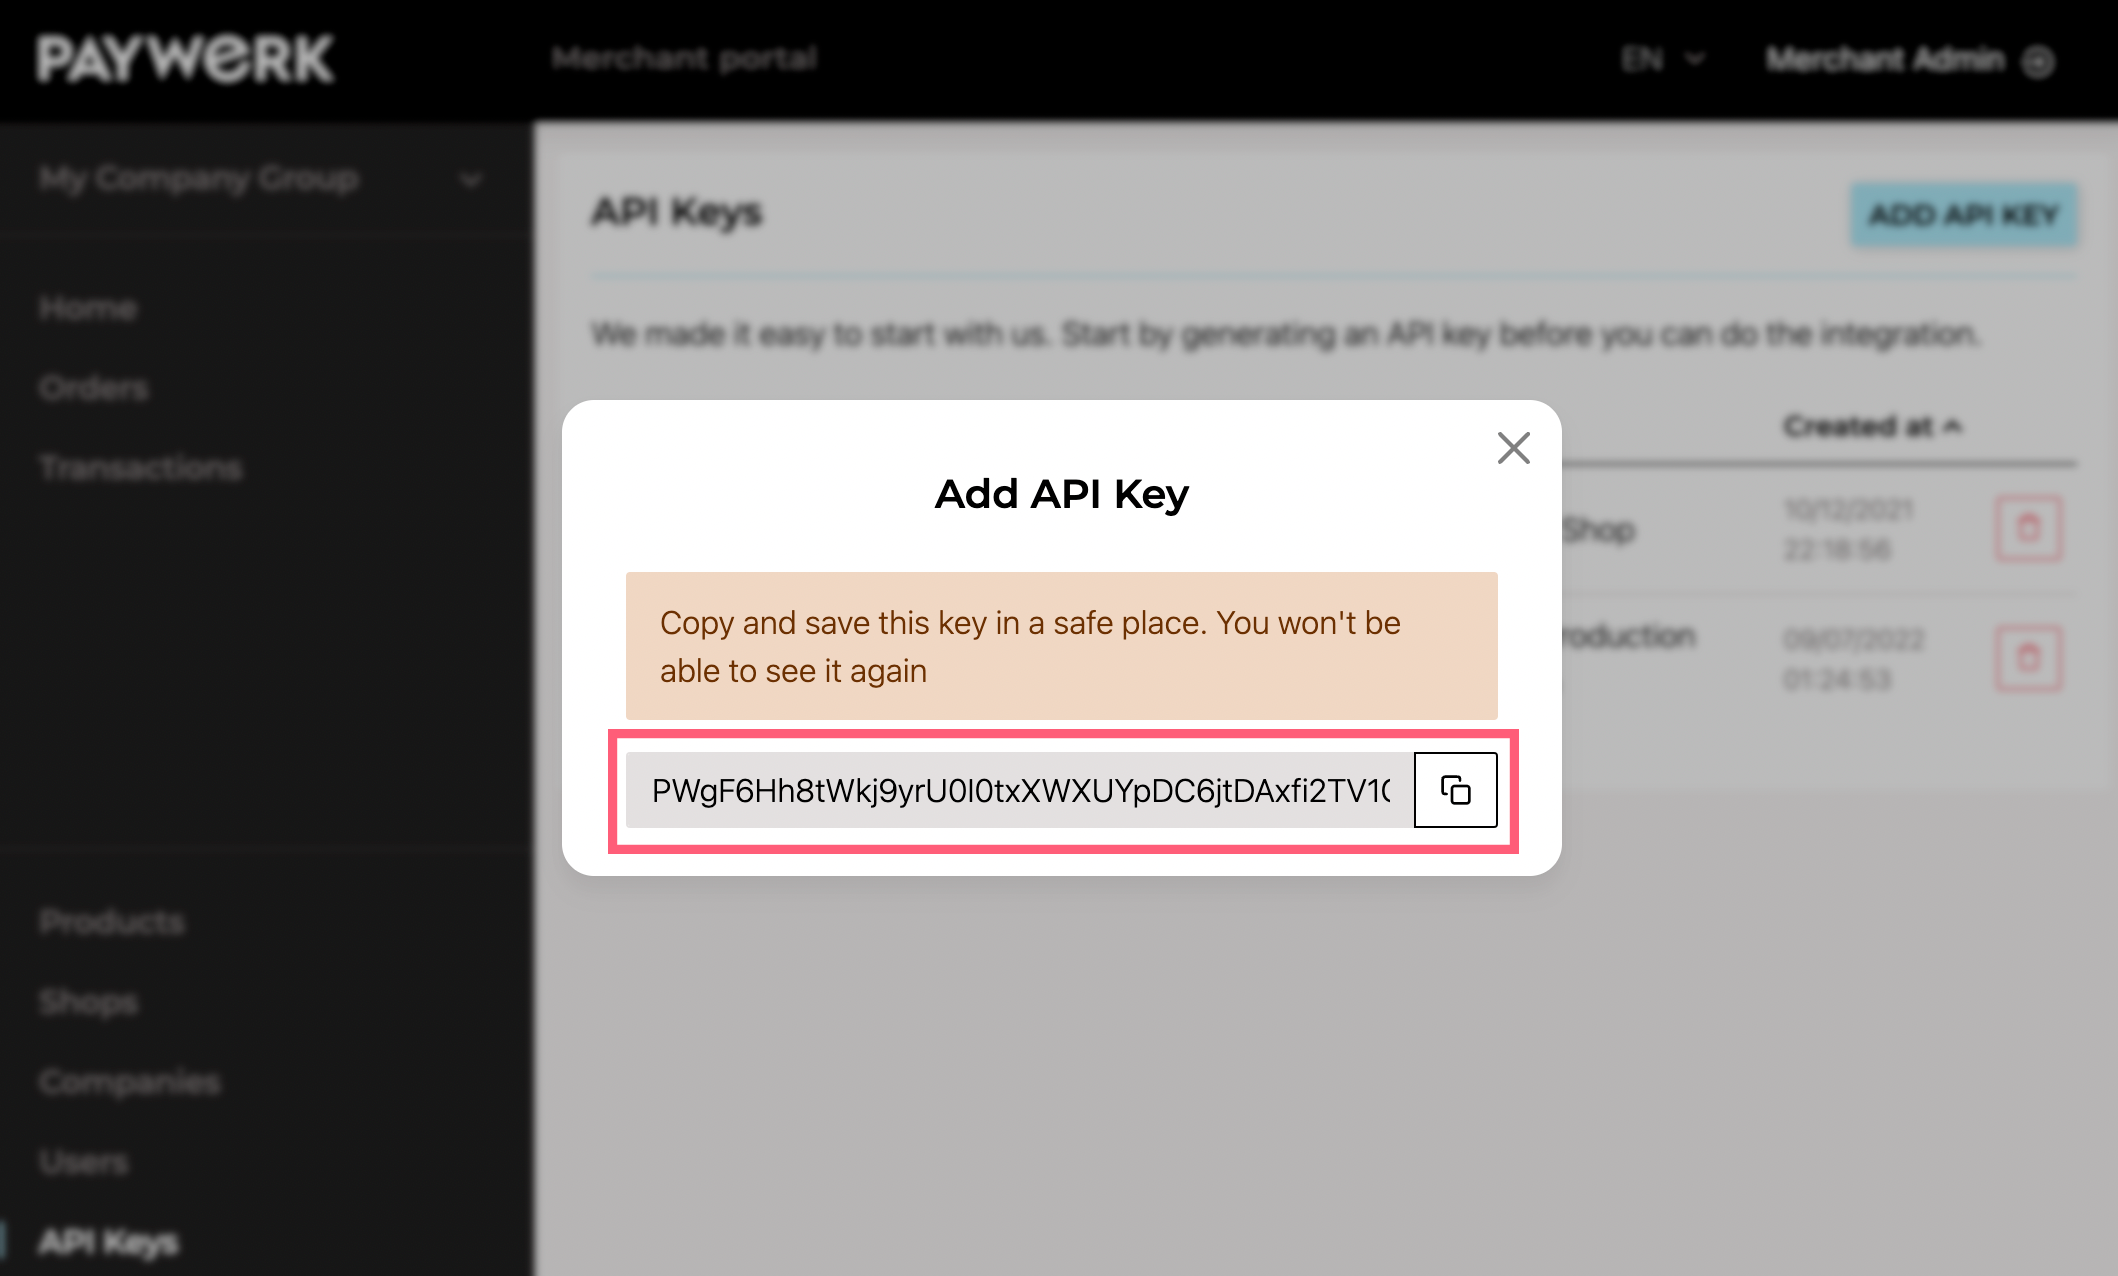
Step 3. Find you API key and store it securely. API key is created! Now all you have to do is store it in a secure place. Your API key can perform any activity that is available in Paywerk's Merchant API, therefore it's sensitive information. Please note that API key is shown only once and cannot be retrieved after the modal is closed.
Step 4. Insert API key to your shop. If you use a plugin, refer to the plugin's section of this documentation. In any other case, store the API key in your shop's configuration, secret manager of other place where the shop can retrieve it for making queries.
Header
In any request you send towards Paywerk, you need to pass the Authorization header. The only exception is the Health Check API request which does not require authentication.
Authorization: Bearer YOUR_API_KEY_HERE
For Paywerk scripts to function, the merchant's site must allow Paywerk domains in its CSP rules.
If CSP is already implemented:
It is mandatory to add Paywerk’s domain to thescript-srcdirective. Otherwise, Paywerk JavaScript will not load.If CSP is not yet implemented:
We strongly recommend implementing CSP via server headers. As a fallback, you may also add an HTML<meta>tag.
Example: extending an existing CSP:
script-src 'self' https://*.paywerk.co;
In practice, add
https://*.paywerk.coto your existingscript-srcdirective, keeping all current sources (e.g.'self', CDNs, nonced scripts).
Note: always use thehttps://scheme;http://will usually fail on HTTPS sites (mixed content). Allowingdata:for scripts is generally unnecessary and insecure.
Recommended server header (preferred):
Content-Security-Policy: script-src 'self' https://*.paywerk.co;
HTML <meta> fallback (only if headers cannot be configured):
<meta http-equiv="Content-Security-Policy" content="script-src 'self' https://*.paywerk.co">
Paywerk offers integration with certain e-commerce platforms.
Currently we support with dedicated plugins the following platforms: WooCommerce.
| Platform | Latest version | Latest version release date | Supported platform versions | Minimum PHP version | Download |
|---|---|---|---|---|---|
| Wordpress (wooCommerce) | 2.0.3 | 25 August 2025 | >= 5.6.1 | >= 7.0, 8.0 | Download latest |
Sales flow
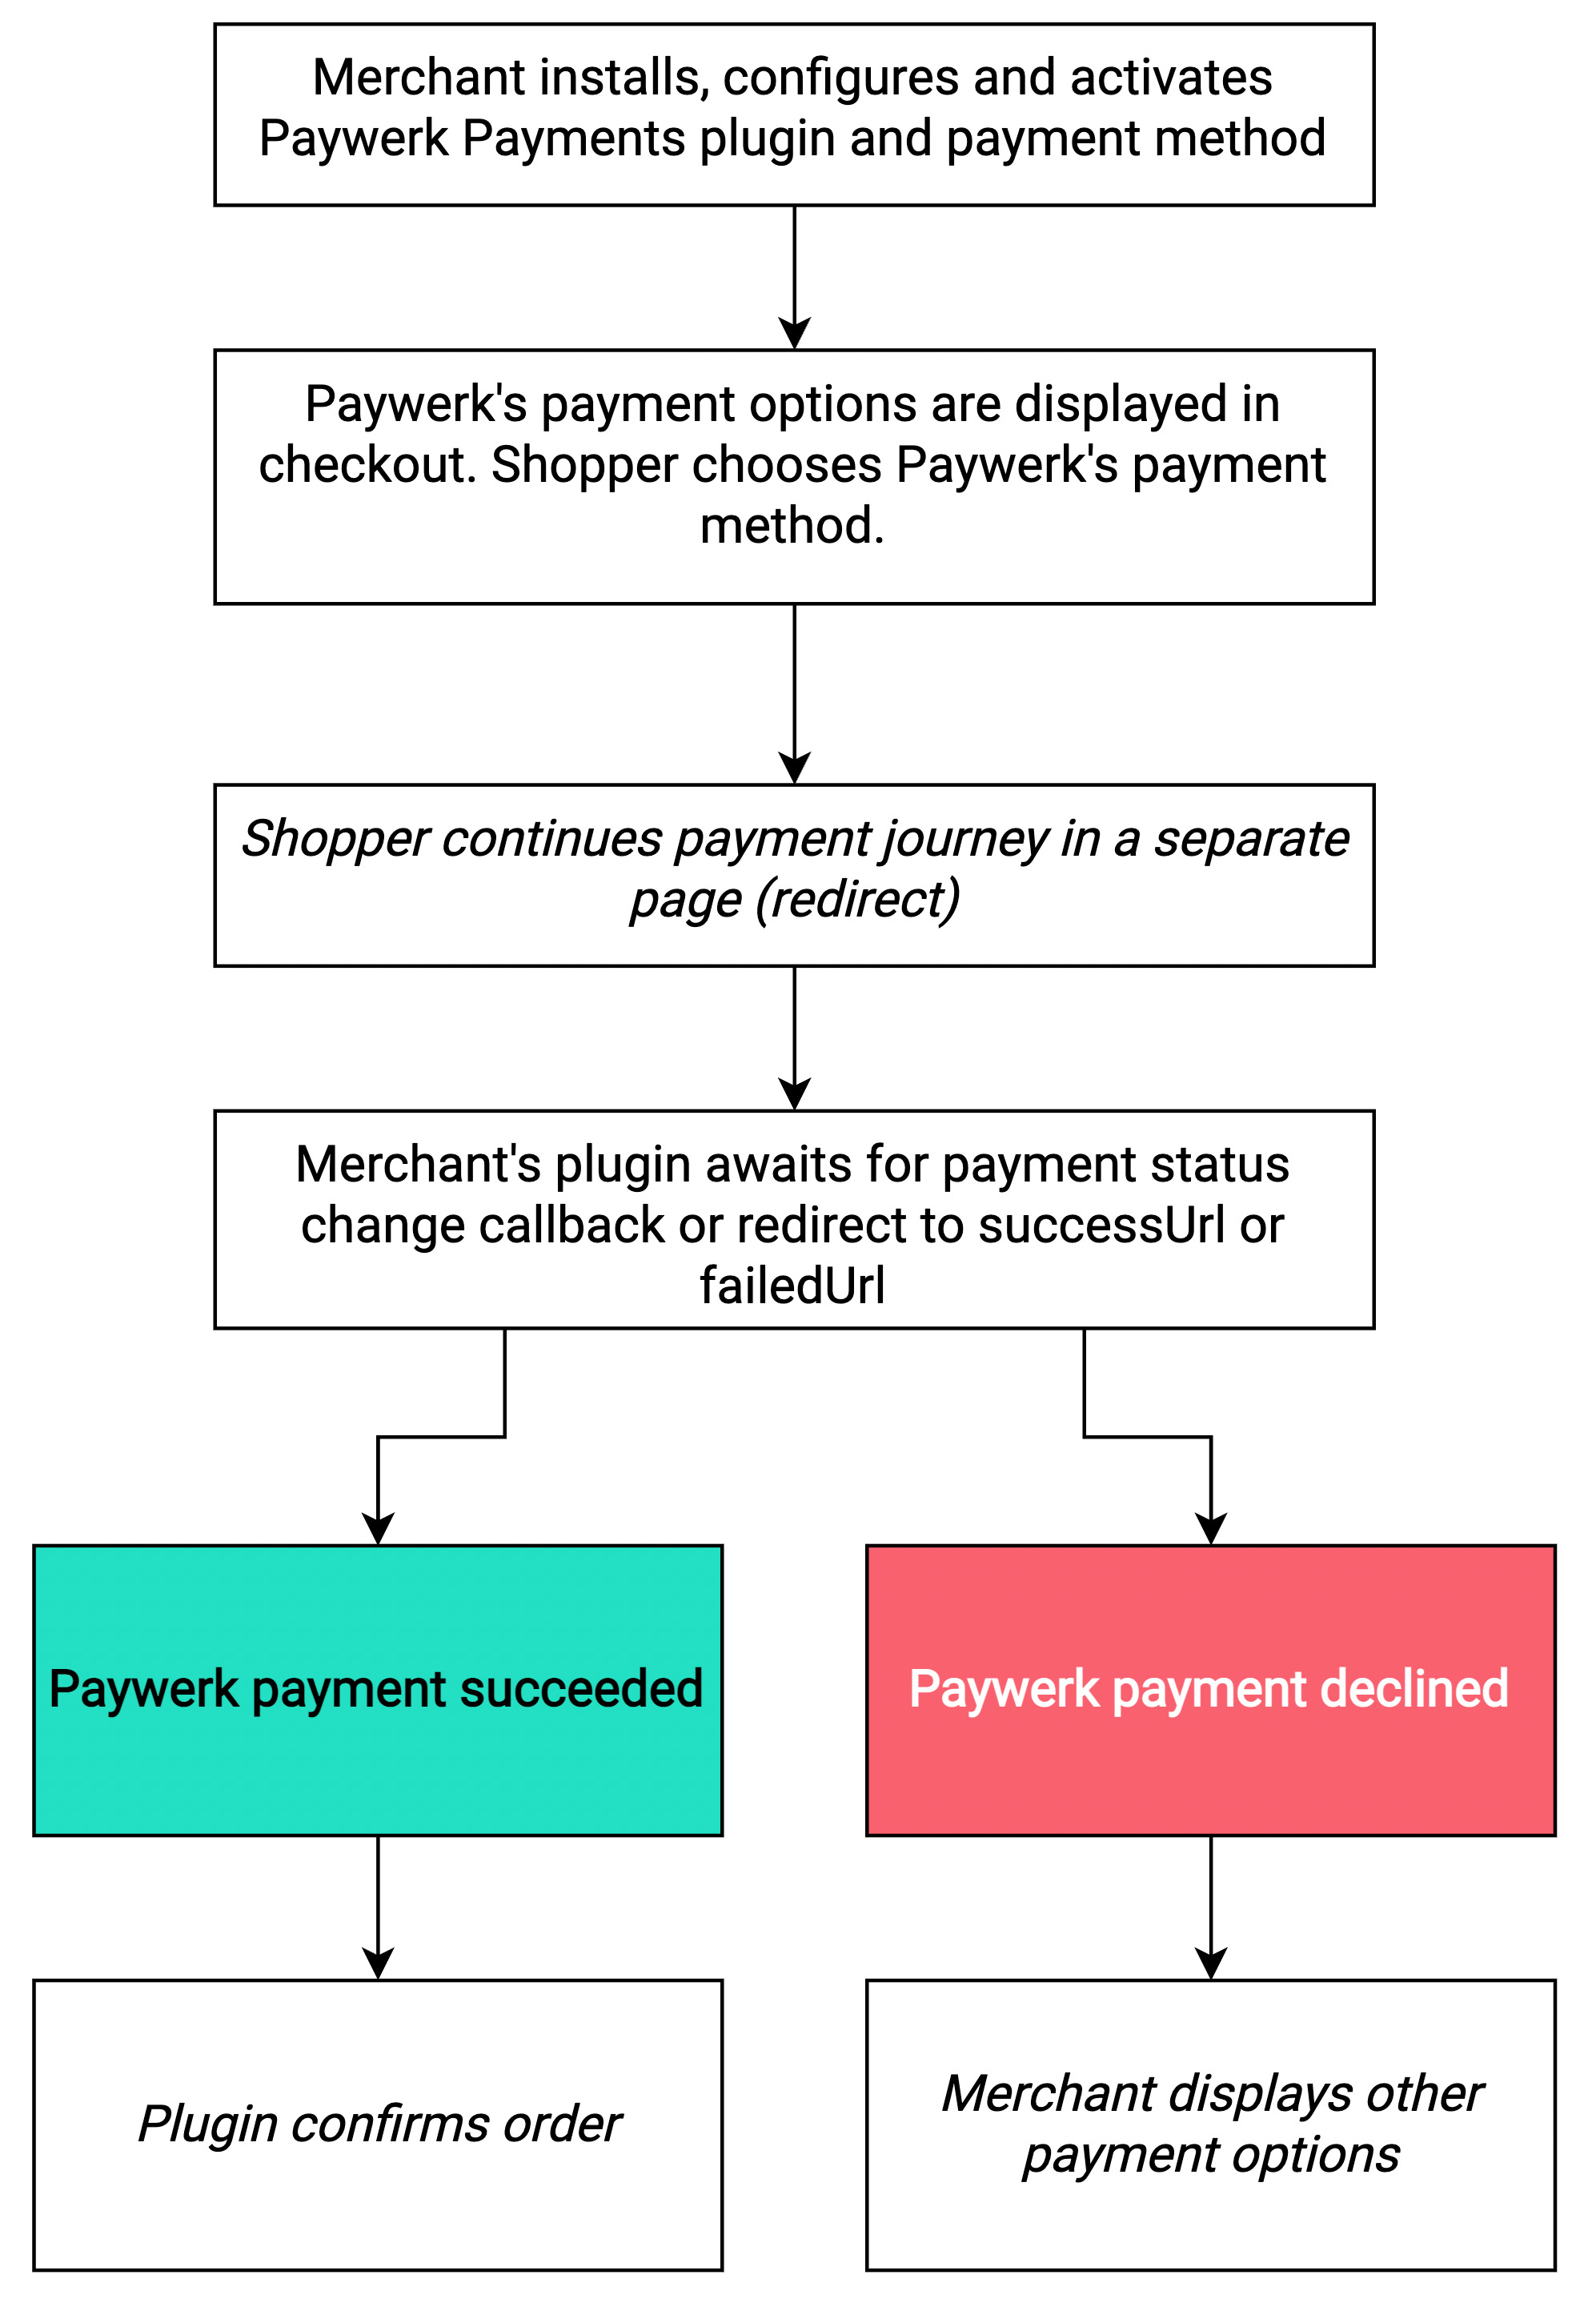
The best way to get Paywerk plugin for WooCommerce is to add it via Wordpress plugin directory. That way you'll be able to get plugin updates automatically or with a single click.
Installation
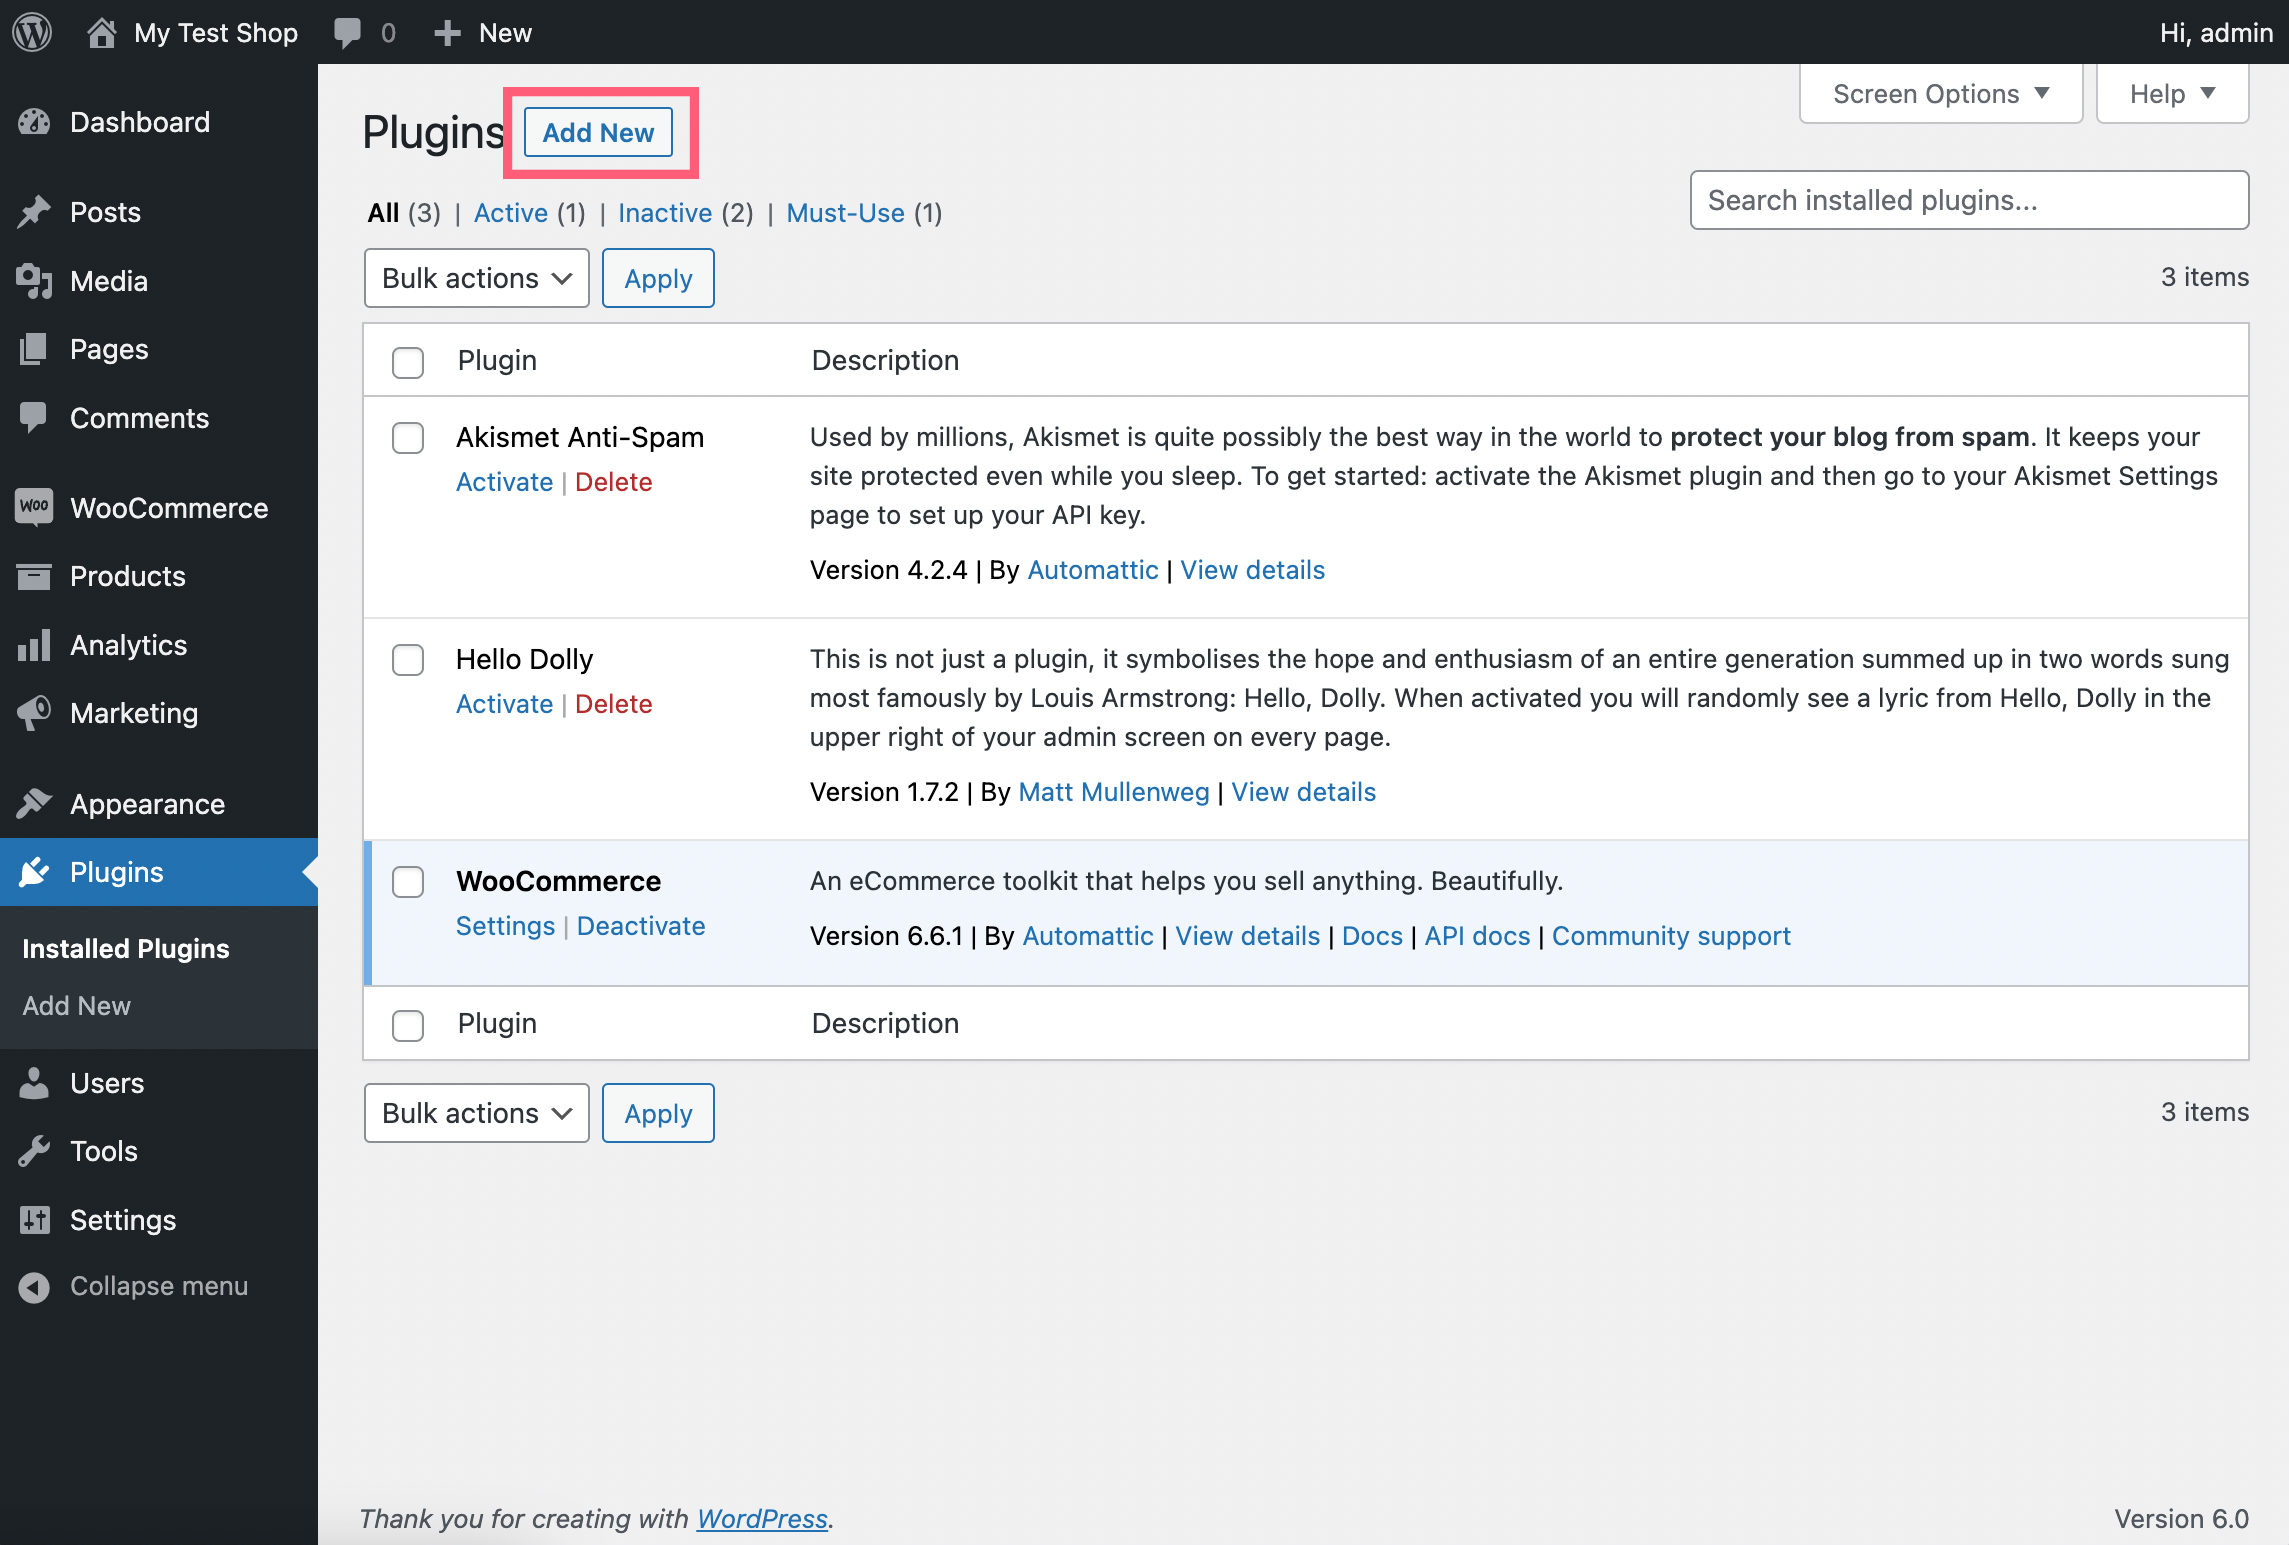
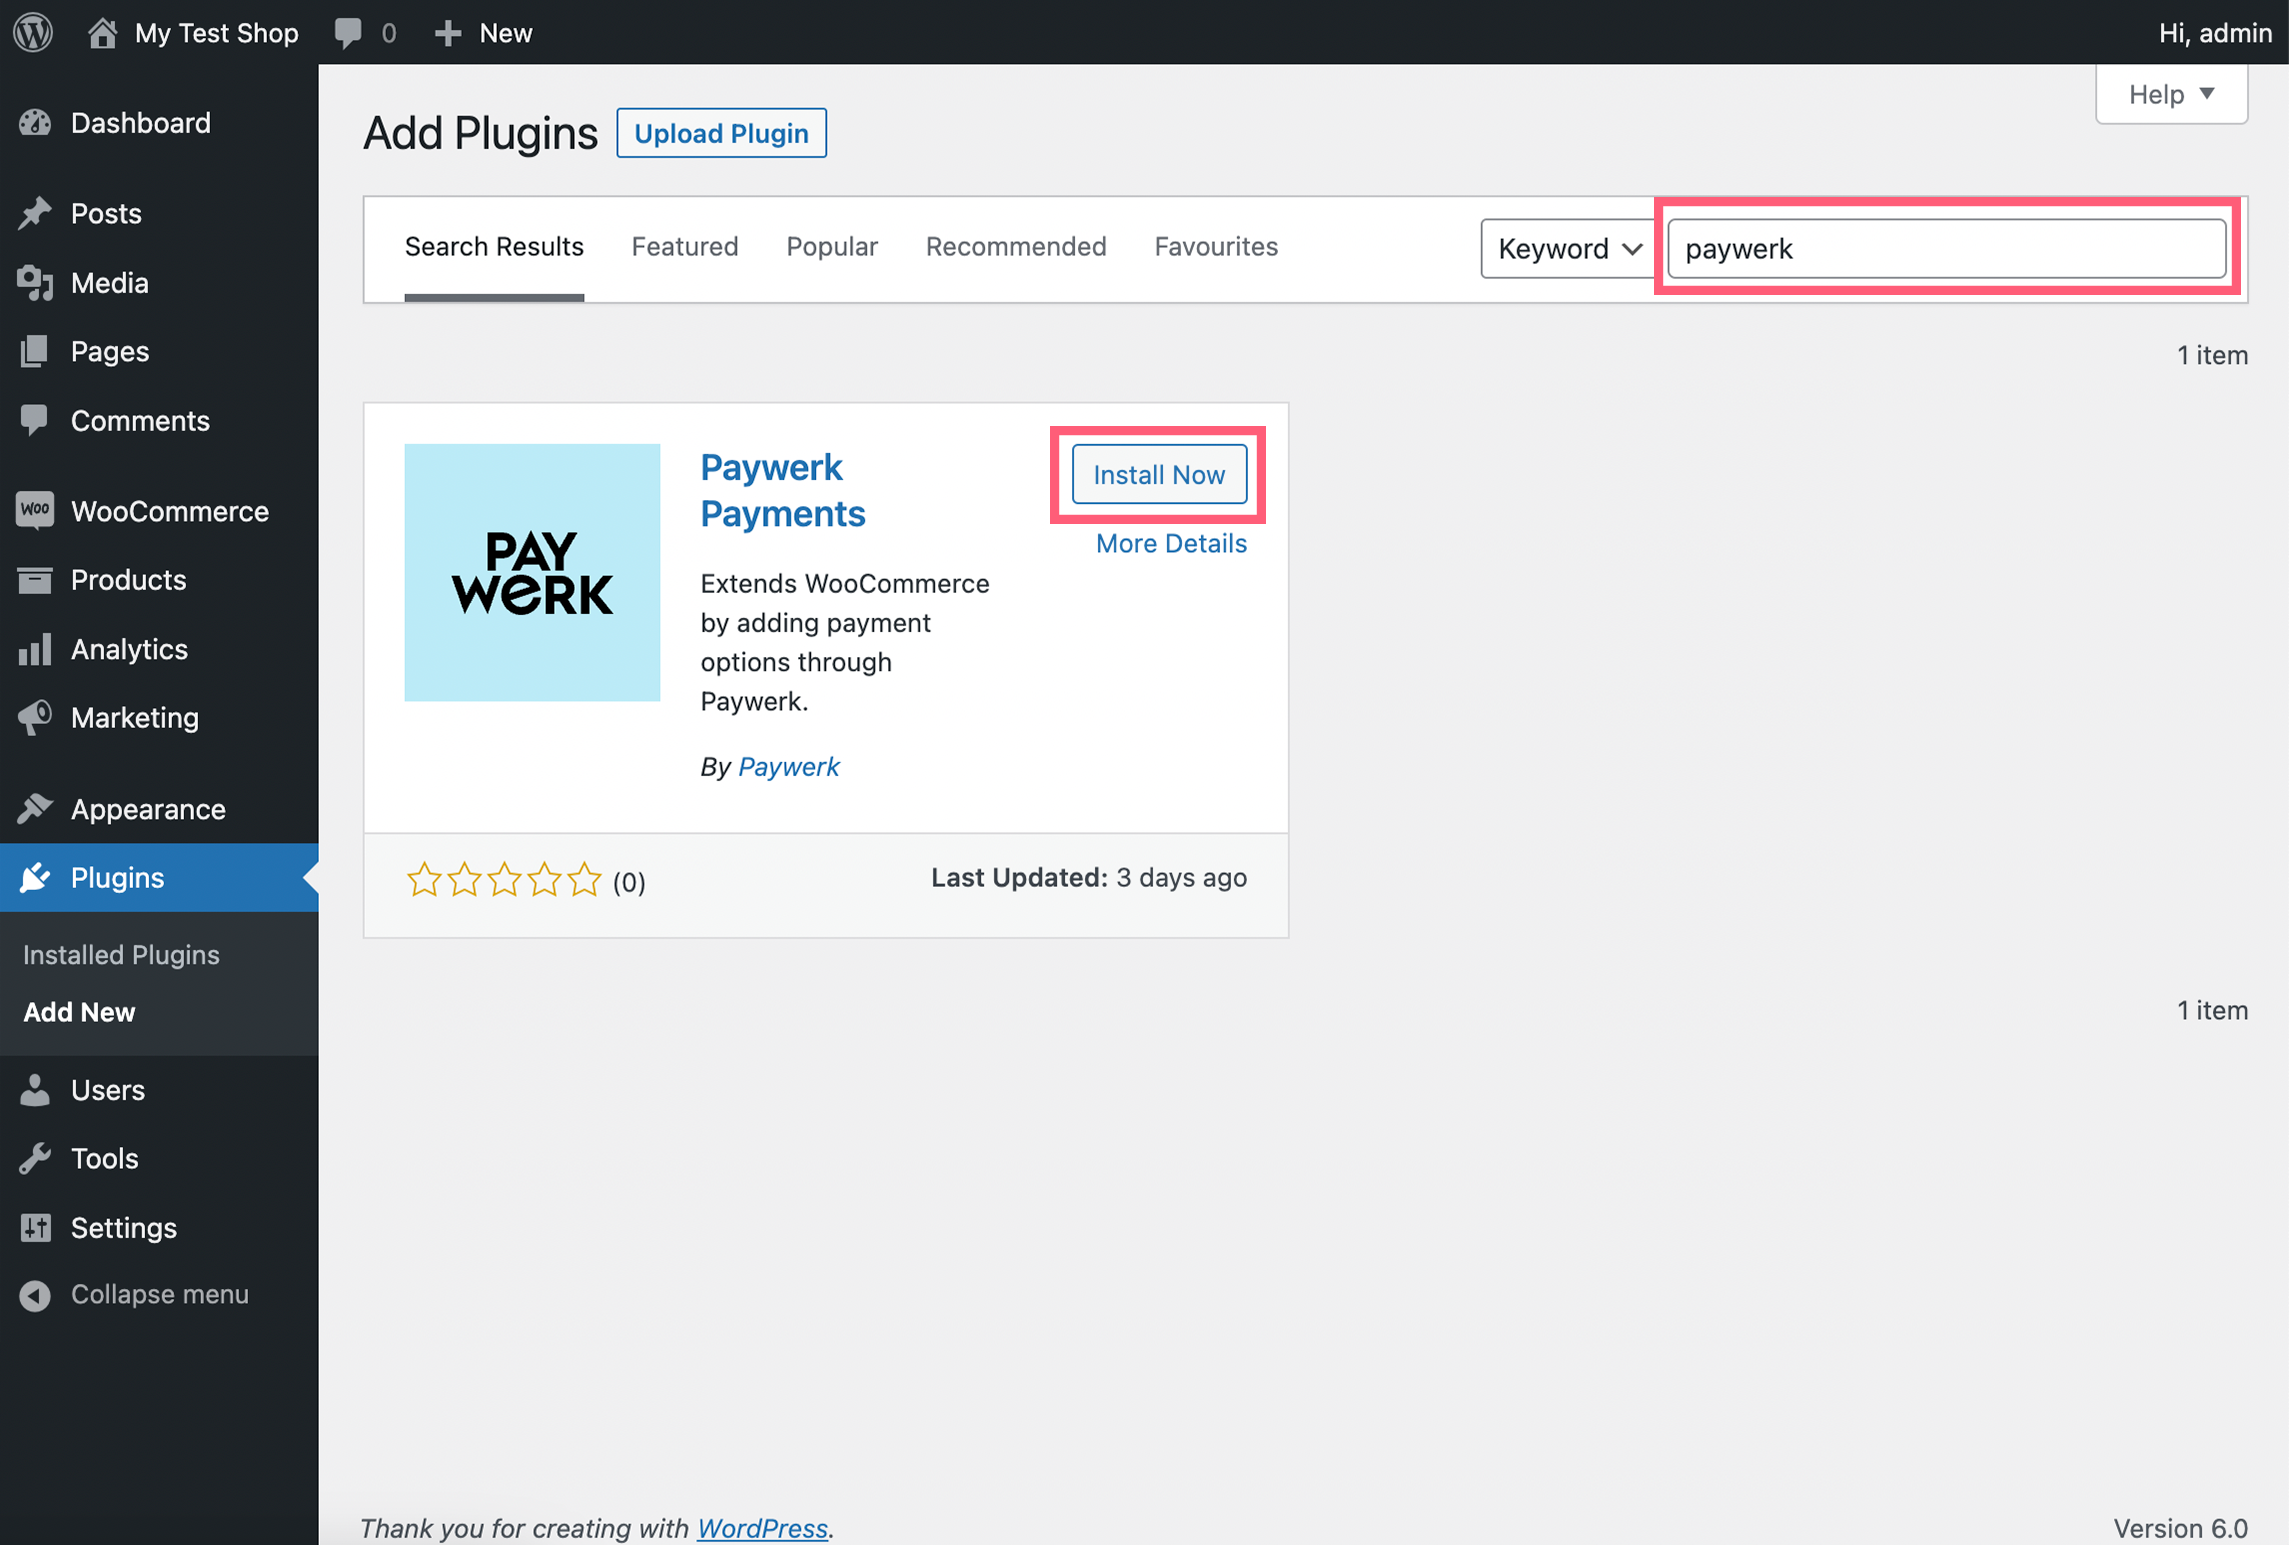
Step 1. Go to Wordpress's Plugins menu. Click Add New.
Step 2. Enter keyword "Paywerk" and search for the plugin. When finding Paywerk Payments plugin, click Install. Alternatively you can also download the plugin and upload it from the same screen.
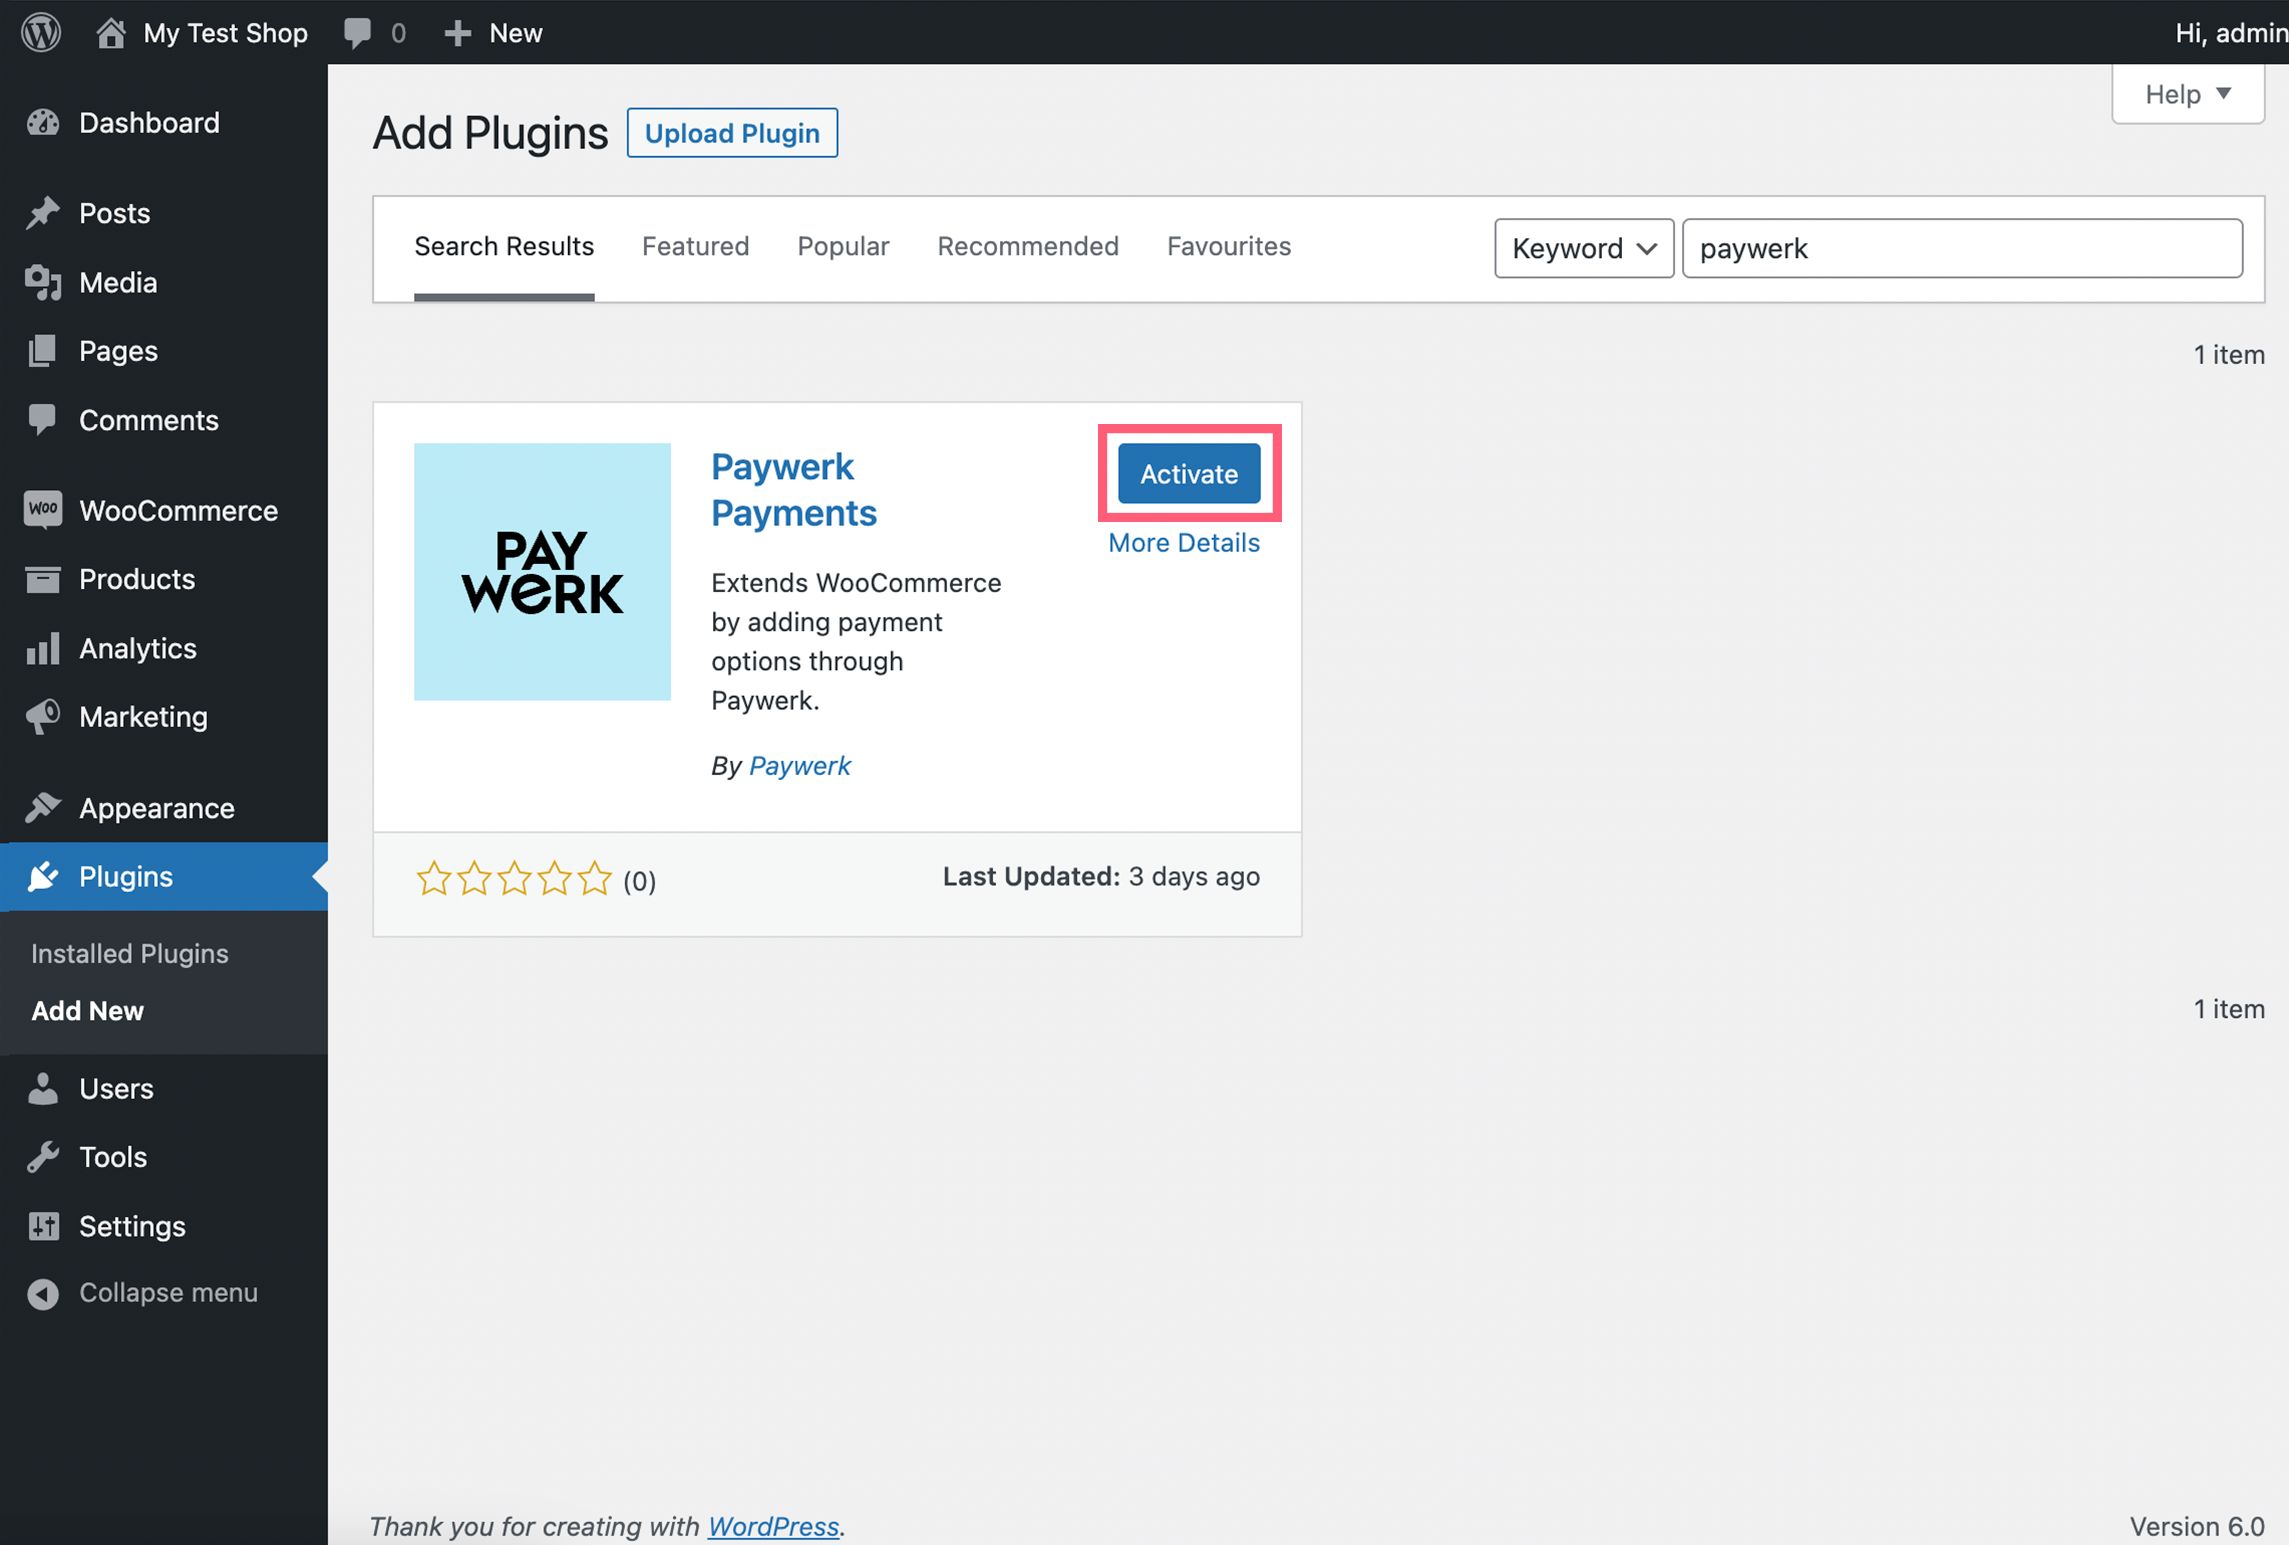
Step 3. Start plugin activation. Click Activate.
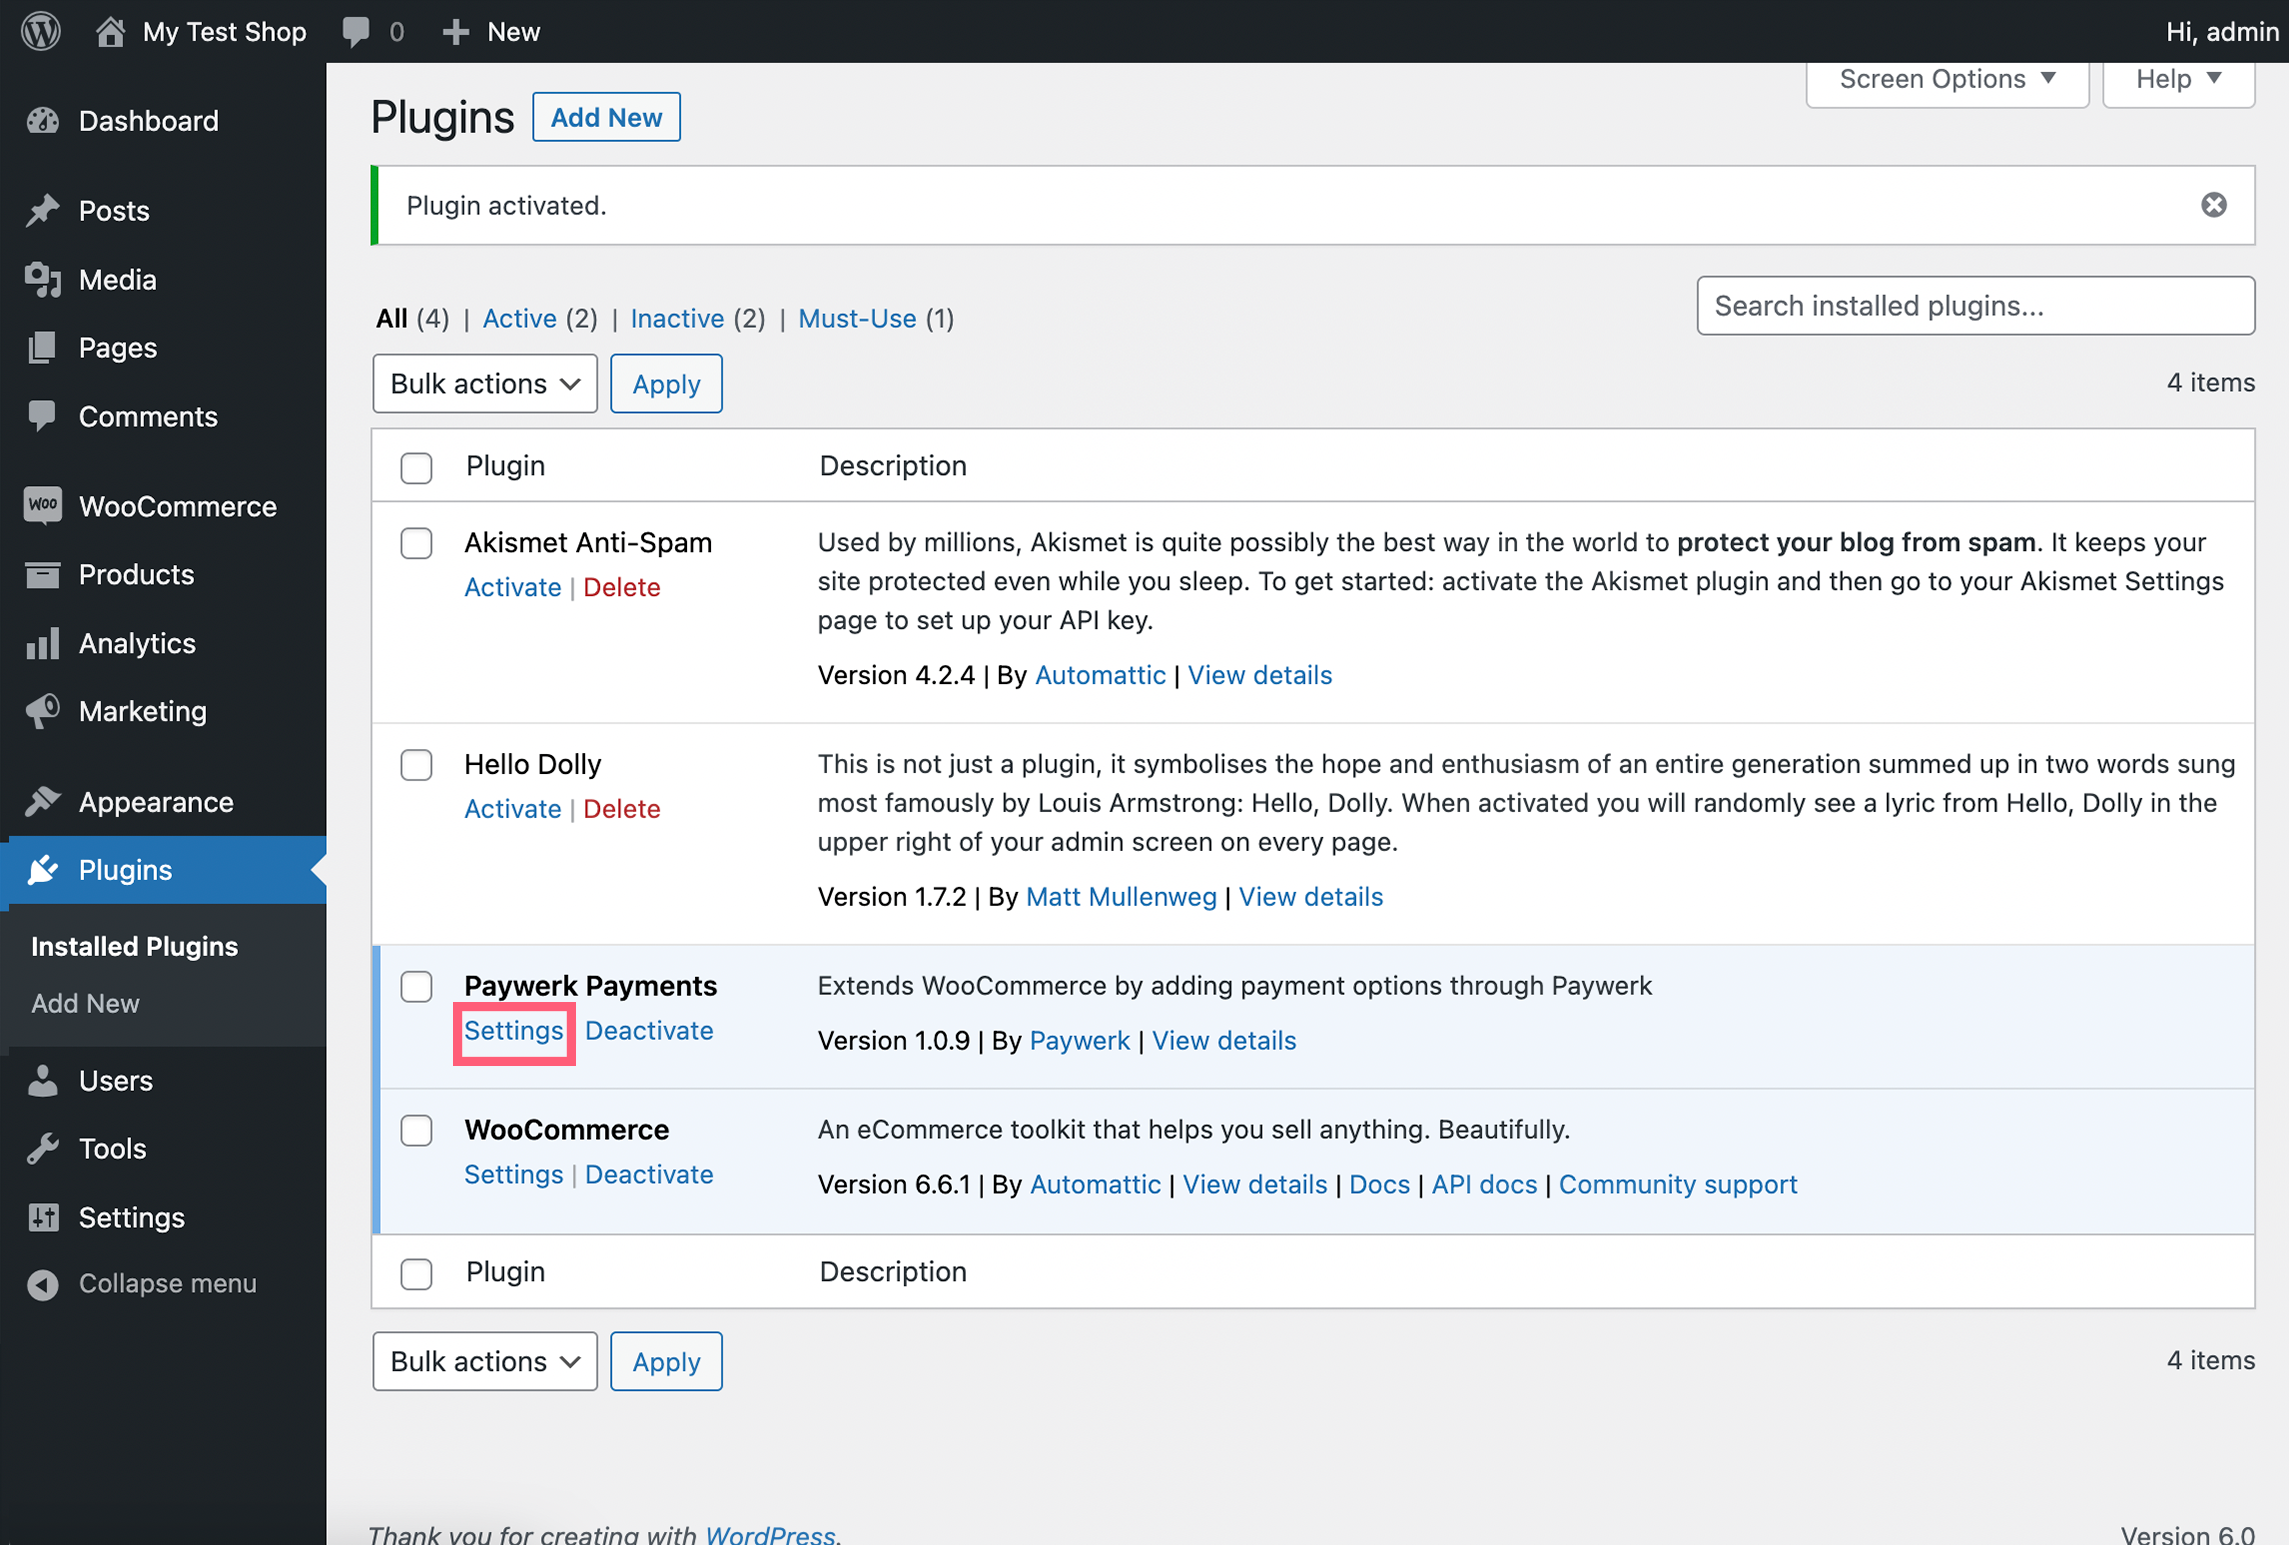
Step 4. Continue setup. Click Settings link on Paywerk Payments plugin.
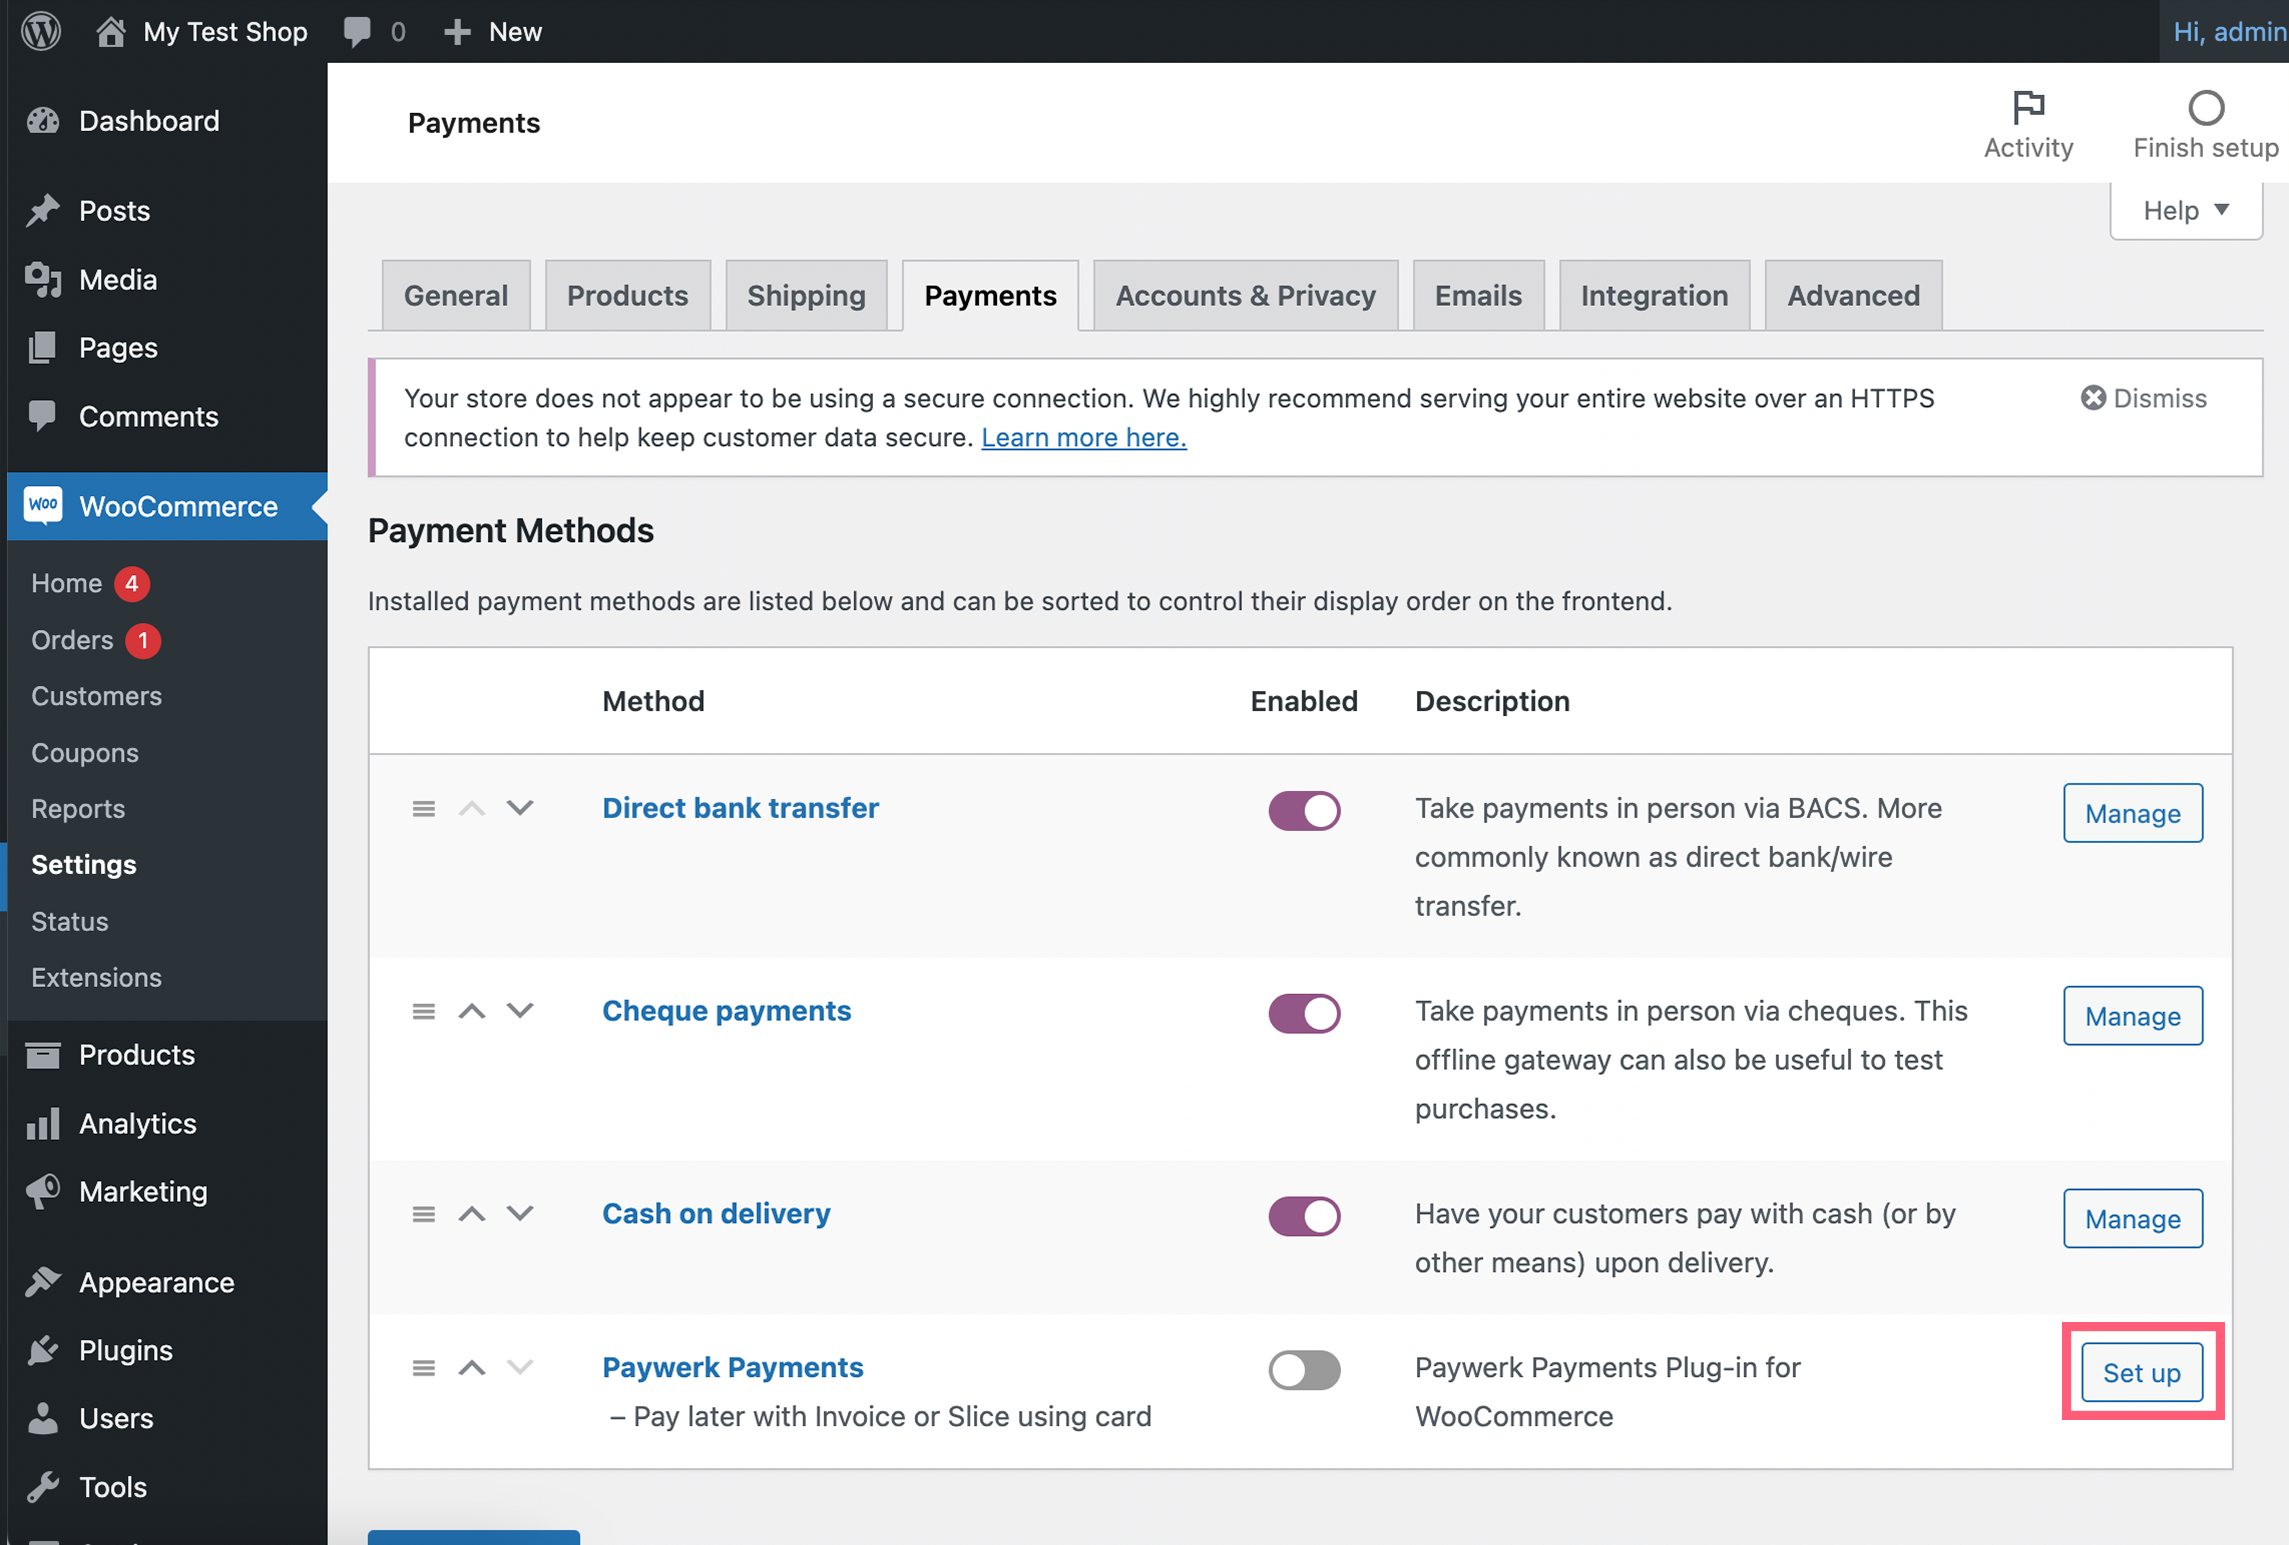
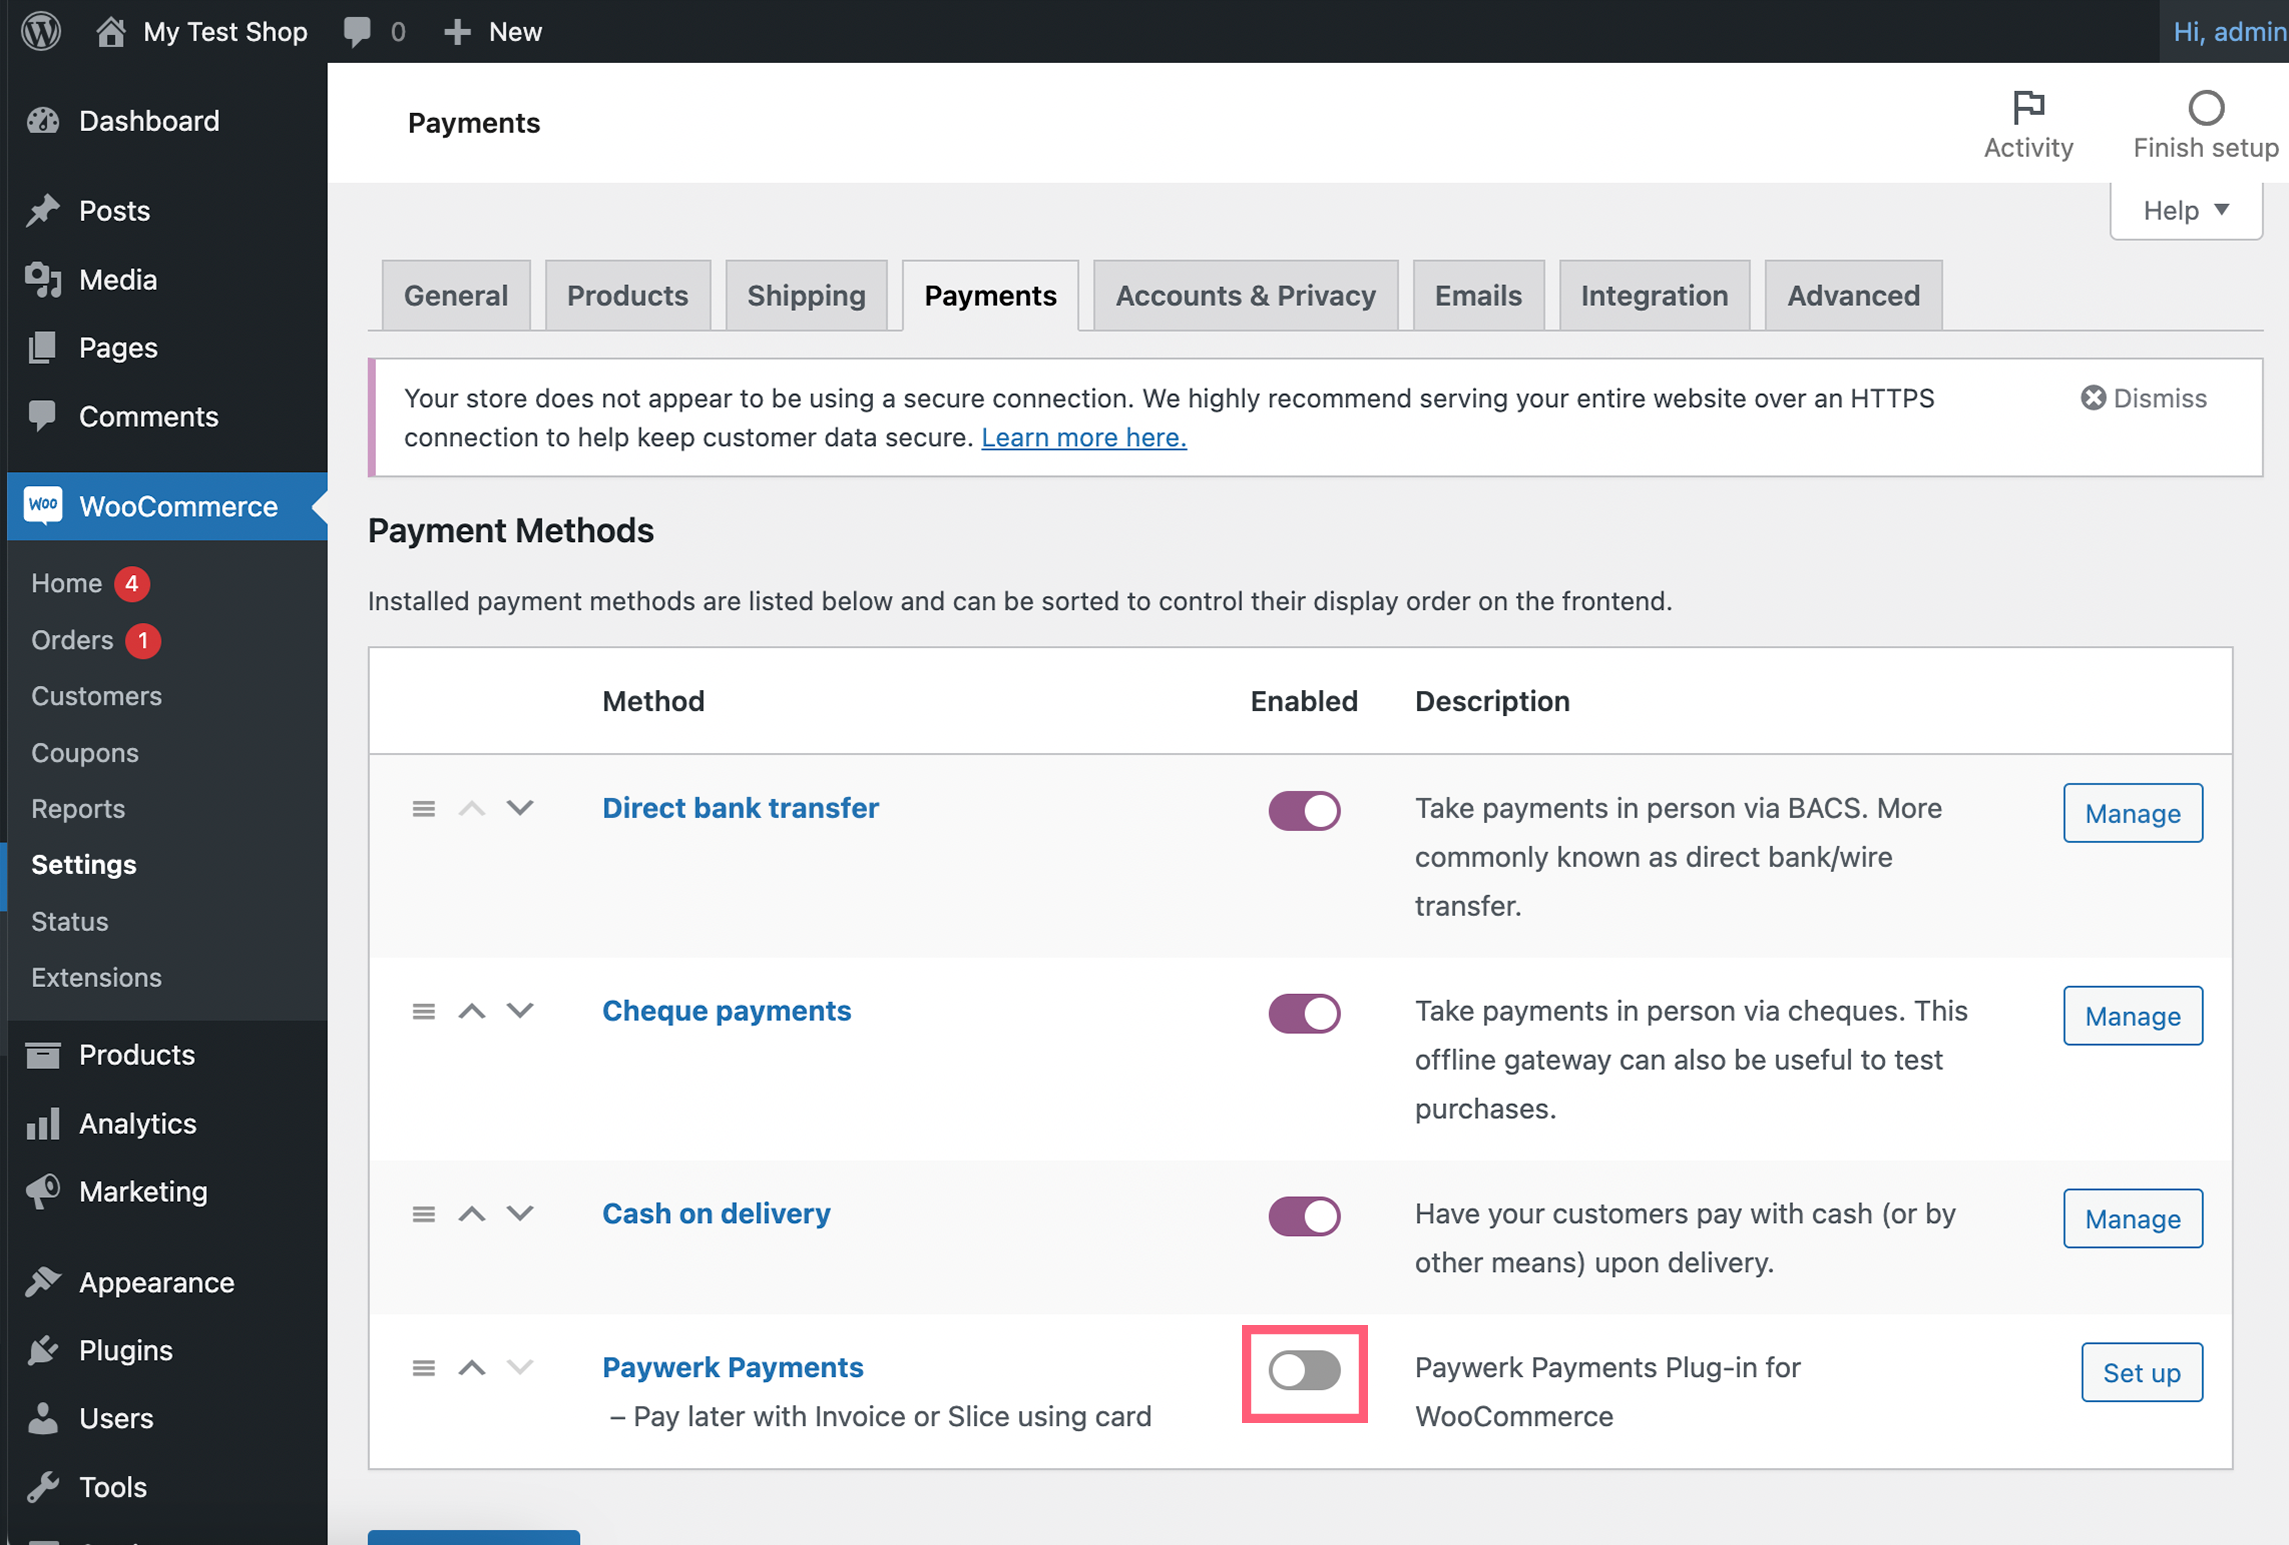
Step 5. Continue setup. You'll be directed to WooCommerce's payments section where you have to choose Settings on Paywerk Payments payment method.
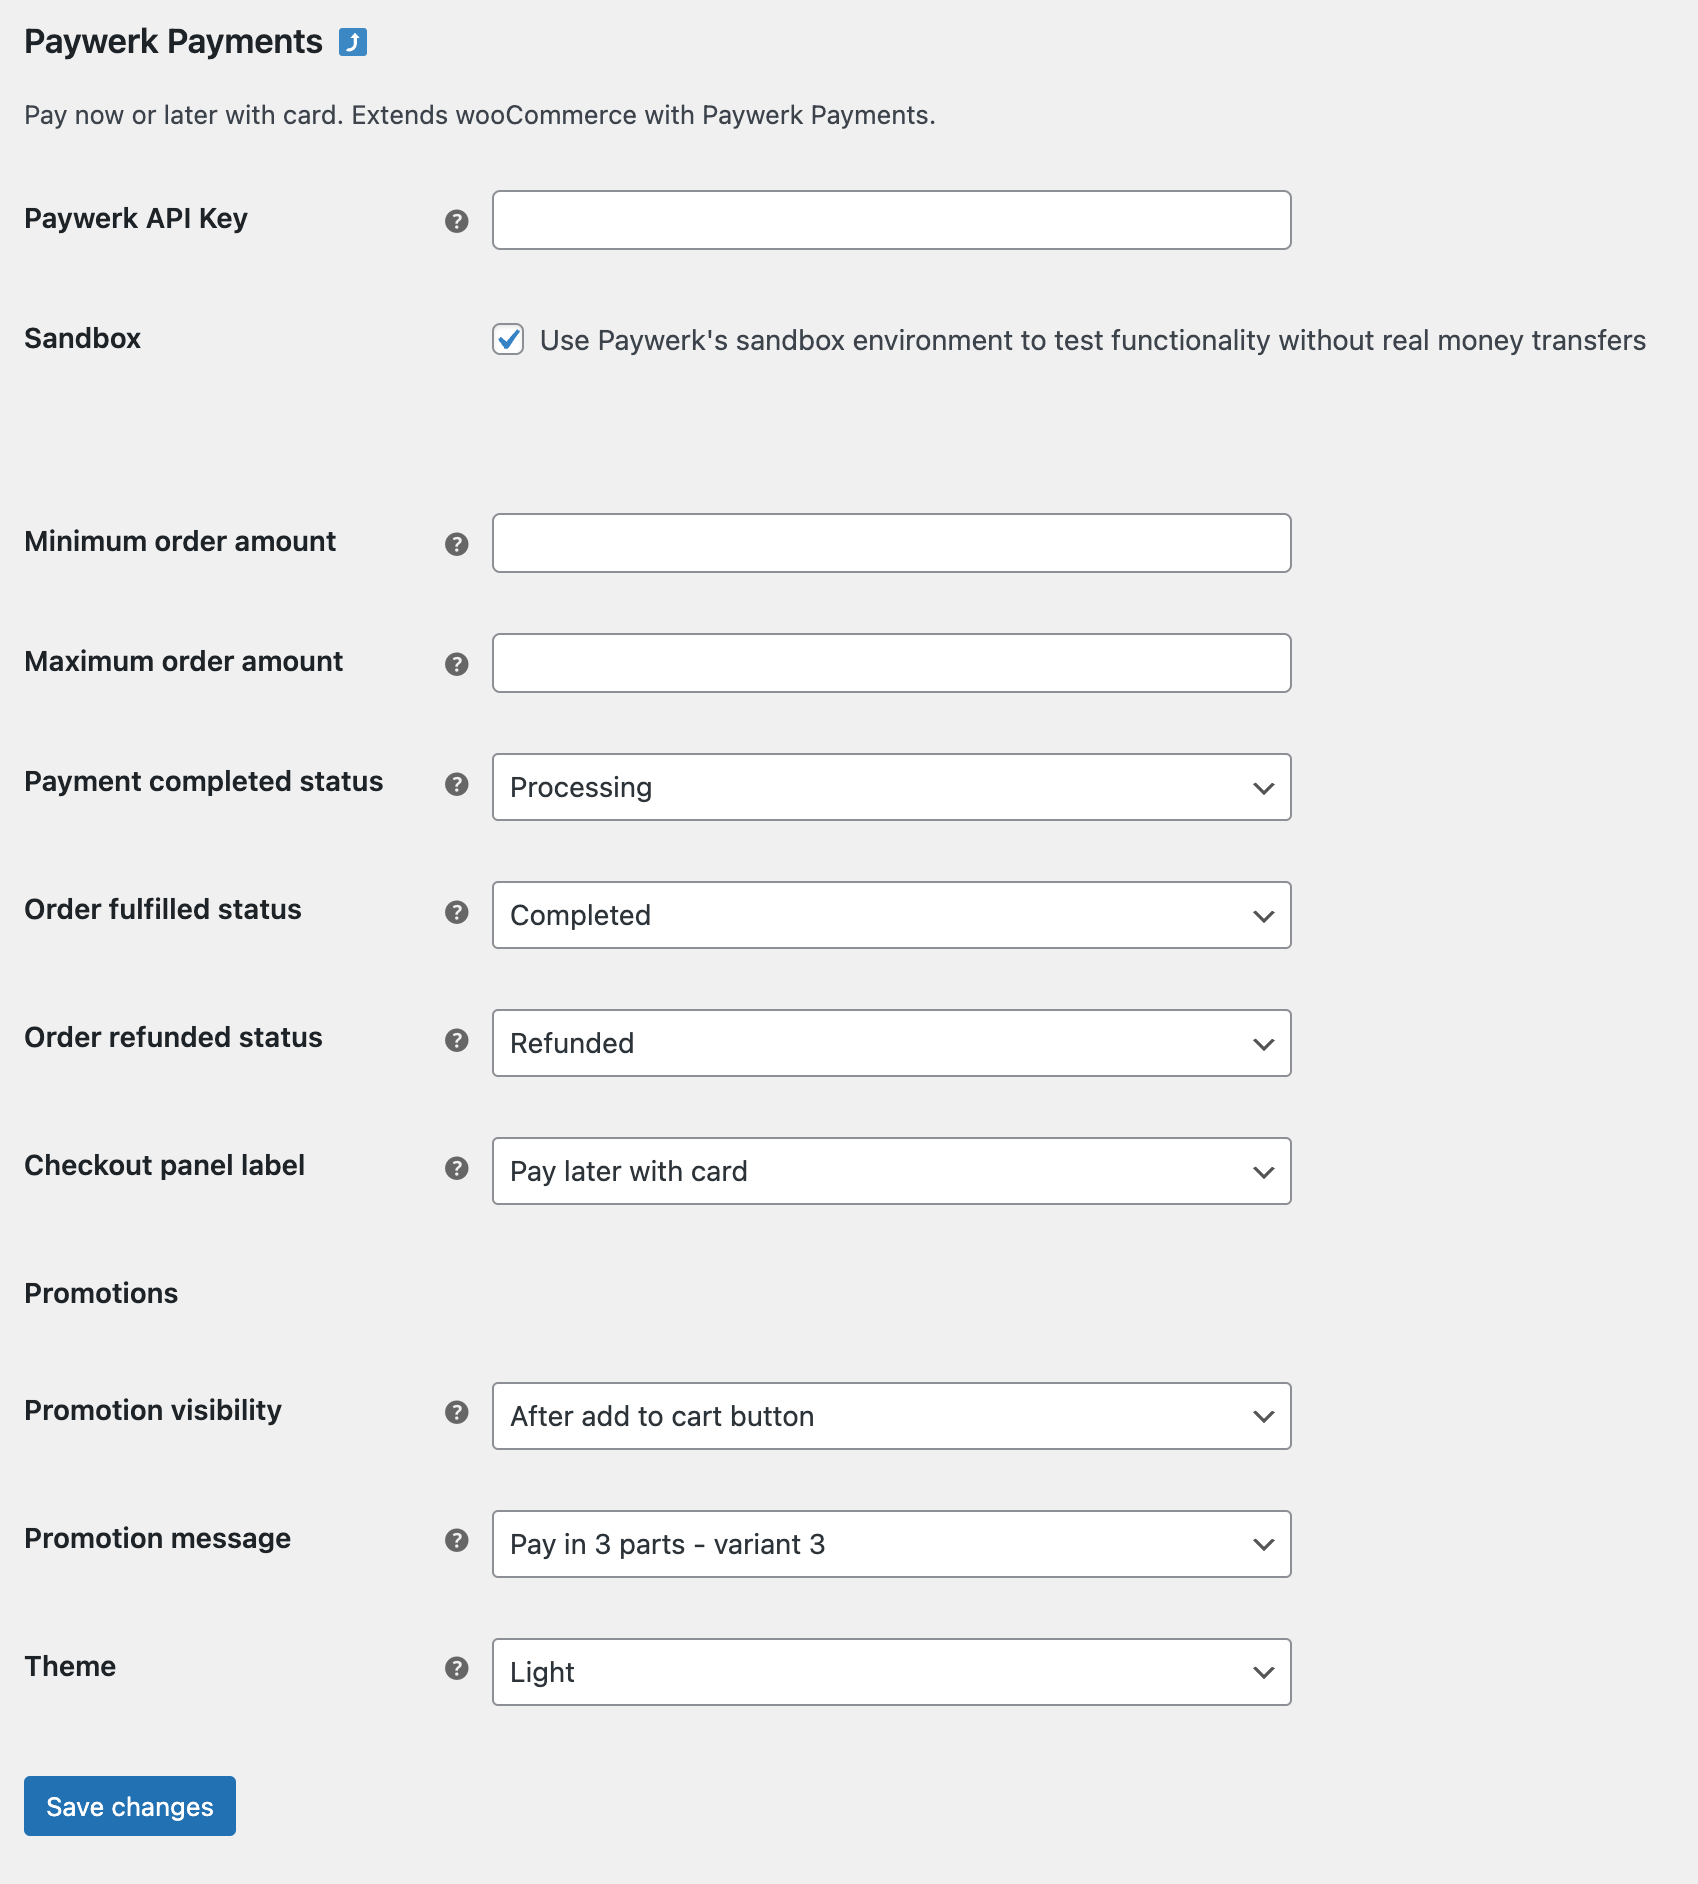
Step 5. Configure Paywerk plugin. Here you have the following configuration options:
Main configuration:
- Paywerk API key - enter the key generated in Merchant Portal. Please refer to API key section of the documentation for more details.
- Sandbox - mark the checkbox if you want to try out the service using your Sandbox account. No real transactions will happen if the checkbox is marked. Do not use in production environment! Please note that in order to retrieve access to Sandbox environment you have to fill a separate merchant application in Sandbox.
Shopping cart total amount based visibility:
- Minimum order amount - if you wish to define a minimum cart value under which Paywerk's payment method is not shown, enter the amount; otherwise leave blank.
- Maximum order amount - if you wish to define a maximum cart value over which Paywerk's payment method is not shown, enter the amount; otherwise leave blank.
Statuses configuration - choose statuses relevant to your shop's processes:
- Payment completed status - choose the status to which the order is pushed after successful Paywerk payment. Default value: Processing.
- Fulfilled status - in case the order gets this status, a fulfil all request is sent to Paywerk, fulfilling the order fully. Default value: Completed.
- Refunded status - in case the order gets this status, a refund all request is sent to Paywerk, refunding the order fully. Default value: Refunded.
Title of checkout panel:
- Checkout panel label - choose a title from the predefined titles. If you want to define your own title, choose Custom title from the list and click Save changes. After saving changes you can define payment method title for each language your site uses. Then click Save changes again.
Promotions - show a promotional widget on product pages that advertises free pay later options for shoppers:
- Promotion visibility - in which pre-defined area the promotion is displayed; make sure to test it before since it might not work perfectly with all design templates.
- Promotion message - define which payment method you want to promote and which text you want to use. There are a few variants for each payment type.
- Theme - choose either your website uses a light or dark theme and we'll display the promotion widget in different colour palette.
Note that promotions will be displayed only for products which are in certain price range. Currently it's limited to:
- 100 to 2 000 EUR

Step 7. Activate payment method. You're ready to go! Just switch the payment method slider on.
Sales Flow
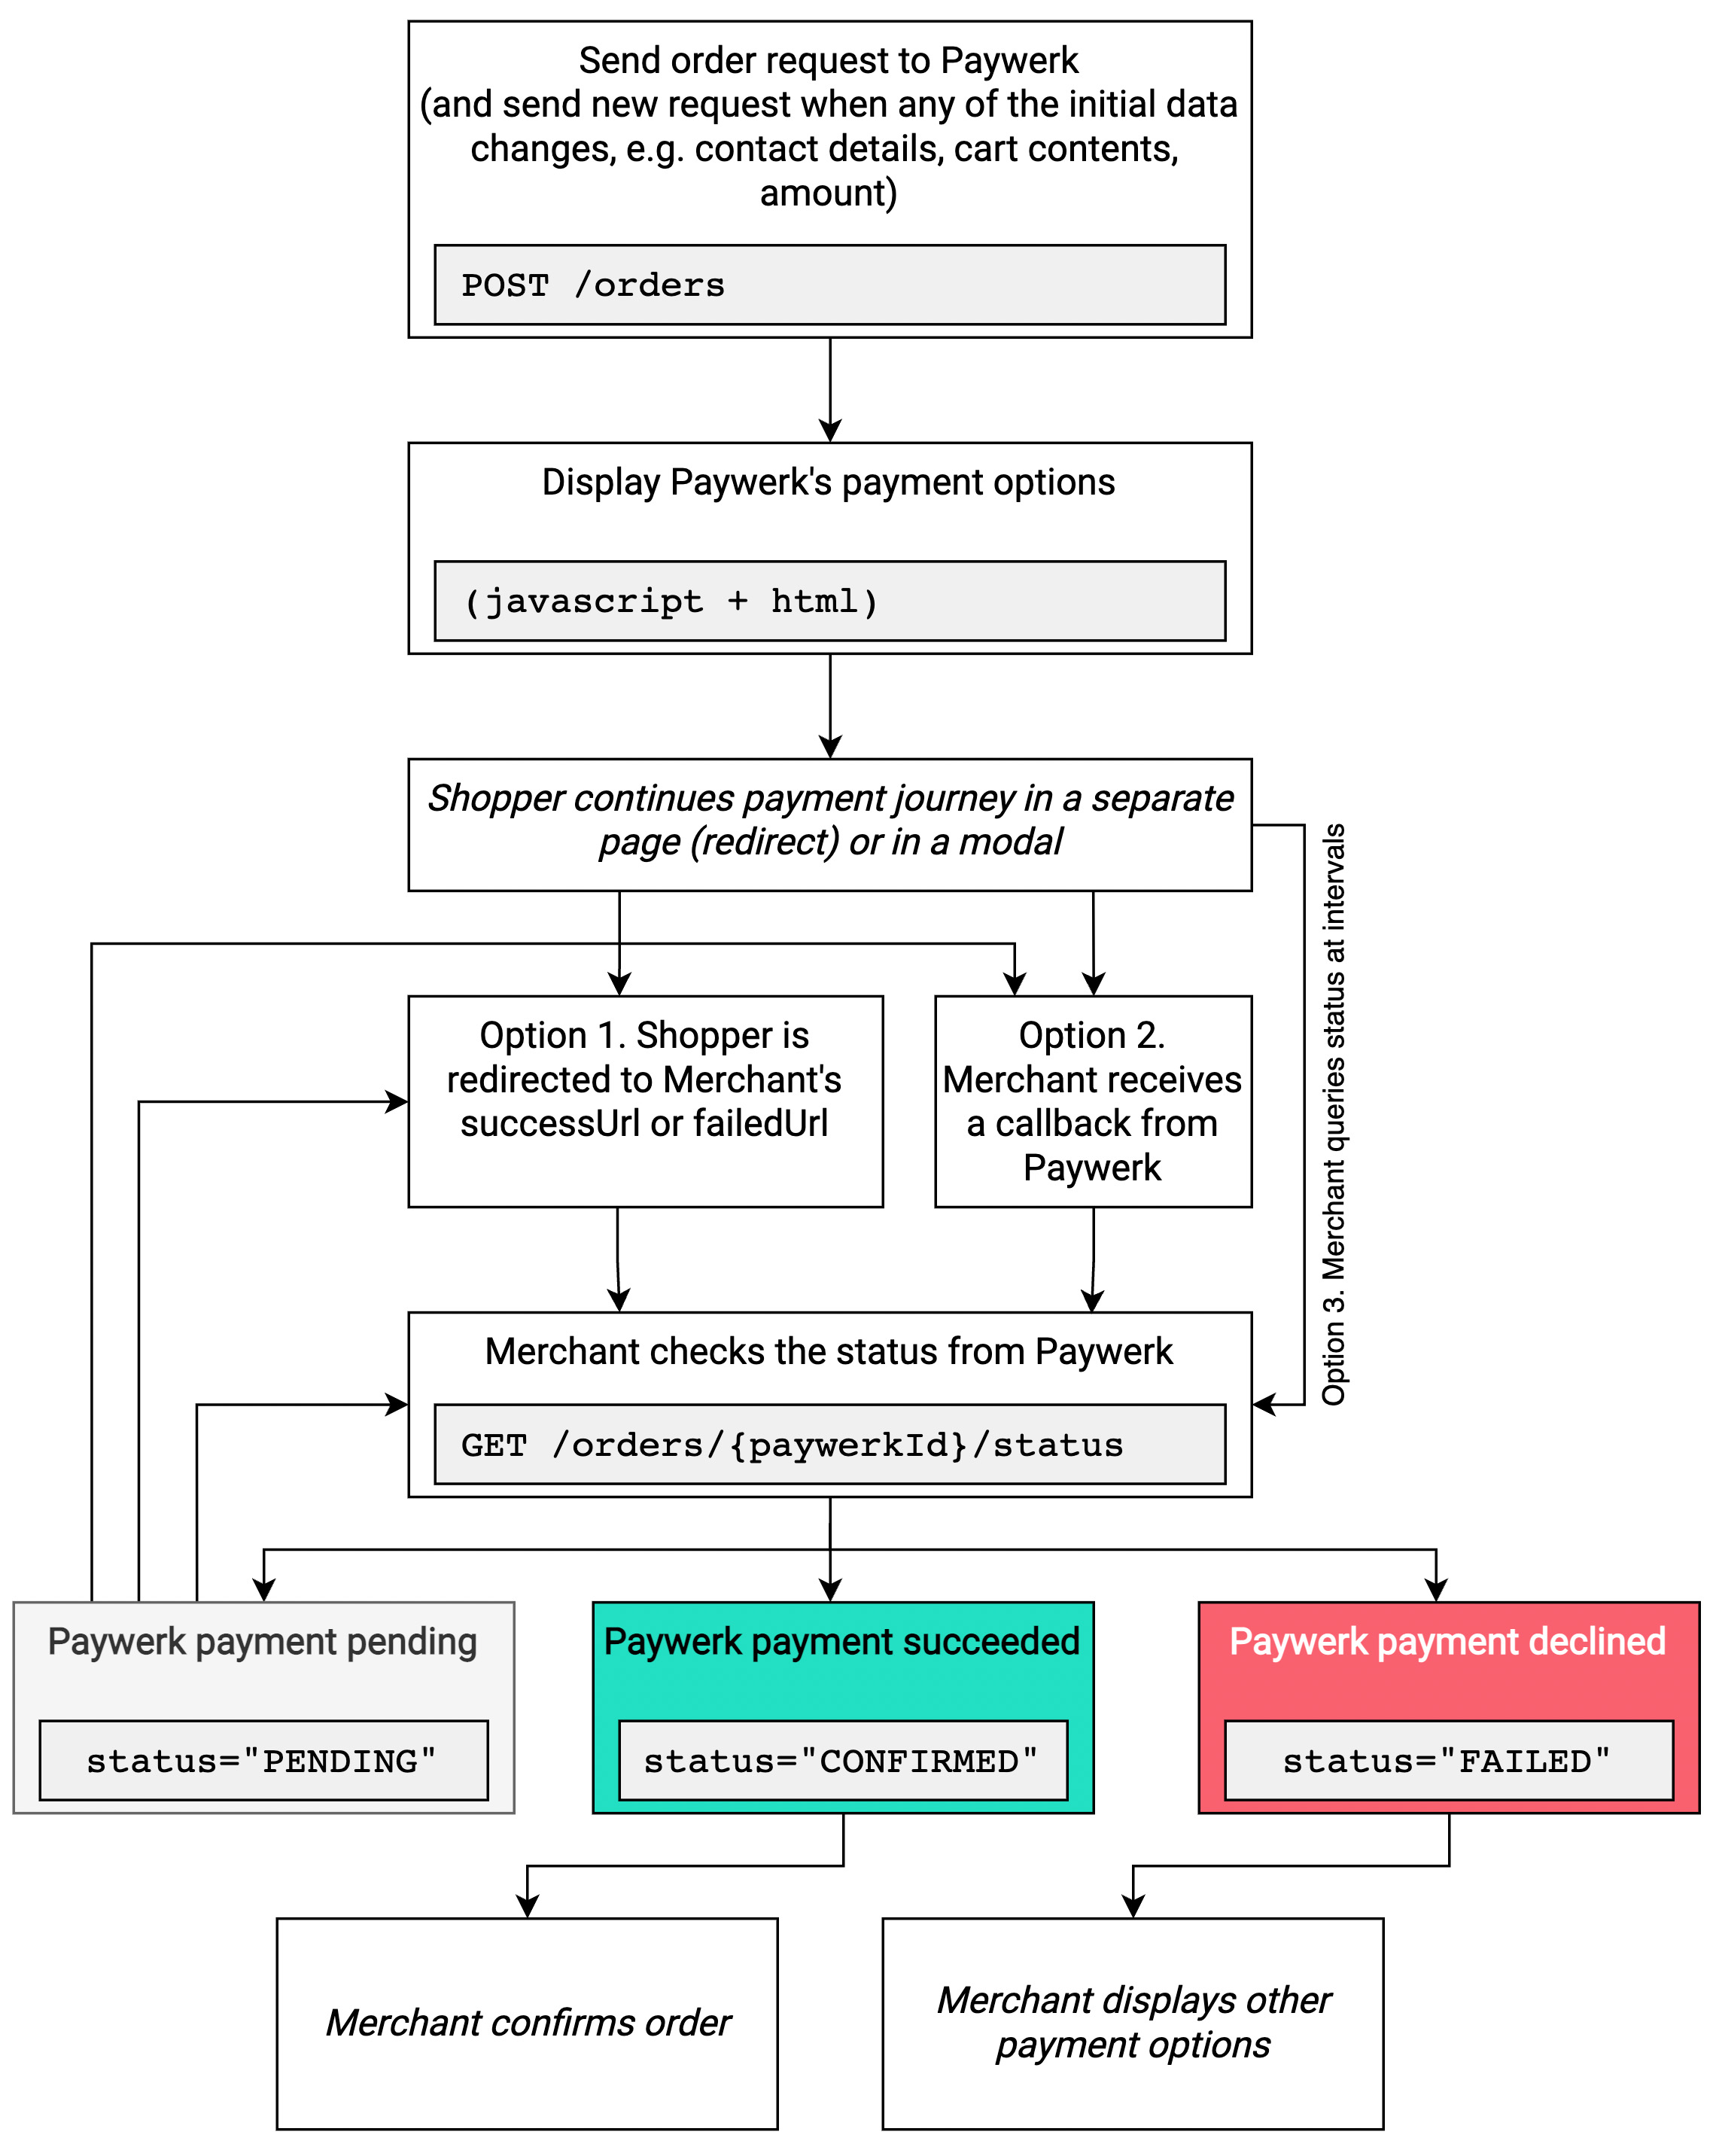
Step 1. Order request. On checkout page where payment options are shown, start by sending the order request POST /orders. The body of the request contains communication language, shopper's name and contact details, purchase amount and currency, and 3 URLs (success, failure, callback). The more data you provide by the shopper, the less the shopper has to fill in afterwards, and the higher the probability of successful payment (in case of Pay Later payment options).
You'll receive back a unique paywerkId which you should store and use in any subsequent queries related to the purchase.
In case there are any changes in any of the initially provided fields (e.g. cart contents or amount changes, shopper data changes), you have to make the same request again. If you make a new request and send the same order reference (field reference) as before, the paywerkId will usually be the same in case (nevertheless, always check and use the latest). In case the order reference is changed, paywerkId will also change. You would receive error 409 in case the shopper has already continued with the payment but for some reason comes back and starts again. In this case you should update the reference since it has to be unique.
Step 2. Display offer. On checkout page where payment options are shown, include a HTML tag in the place you'd like to show Paywerk payment options:
<paywerk-products paywerkId="{paywerkId}"/>
{paywerkId} refers to the identifier you received in the response in Step 1.
Additionally, you have to include a JavaScript from Paywerk (refer to URL: https://checkout.sandbox.paywerk.co/ui/shop.js for Sandbox and https://checkout.paywerk.co/ui/shop.js for Production) in order to display the contents inside <paywerk-products />:
Sandbox:
<script type="module" async>
  import 'https://checkout.sandbox.paywerk.co/ui/shop.js'
  // any additional logic here
</script>
Production:
<script type="module" async>
  import 'https://checkout.paywerk.co/ui/shop.js'
  // any additional logic here
</script>
If possible, include the JavaScript directly from Paywerk's URL, so that all updates are automatically accomodated on your web site.
Step 3. Send shopper to the payment flow. Here you have two options:
- Option A: using a modal
- Option B: redirect
It's important that the shopper has selected a payment method inside Paywerk's environment.
In order to listen to the changes in the Paywerk payment options selector, you may use the following combination of HTML and JavaScript, and allow to continue only then paywerkUrl has been provided:
Sandbox:
<input type="hidden" name="paywerkUrl">
<script type="module" async>
  import 'https://checkout.sandbox.paywerk.co/ui/shop.js'

  document.querySelector('paywerk-products').addEventListener('product-selected', function (e) {
    e.preventDefault()
    document.querySelector('[name=paywerkUrl]').value = e.detail.productUrl
  })
</script>
Production:
<input type="hidden" name="paywerkUrl">
<script type="module" async>
  import 'https://checkout.paywerk.co/ui/shop.js'

  document.querySelector('paywerk-products').addEventListener('product-selected', function (e) {
    e.preventDefault()
    document.querySelector('[name=paywerkUrl]').value = e.detail.productUrl
  })
</script>
Note that the additional JavaScript part should be included only when paywerkId is provided.
Step 4. Wait for change in order status. It is recommended to combine multiple options whereas options A and B are both mandatory to implement:
- Option A: Wait for shopper redirect. Shopper is redirected to the URL you provided. Once the shopper has landed in redirect URL, ask from Paywerk the latest status to confirm it (as in option C).
- Option B: Wait for callback to arrive. Paywerk will send callback message as soon as the order status changes in Paywerk's system. Callback doesn't tell you the new status, but it tells you that status has changed and you should make a query (as in option C) to get new status.
- Option C: Query the order status with certain intervals. We recommend using incremental intervals, such as every 5 seconds for a minute, then every 10 seconds for 5 minutes, then every 30 seconds for the rest of the time. We also recommend to stop querying after certain amount of time has passed (what you consider maximum payment process time, e.g., 10 minutes).
Note that options A and B are run by Paywerk in parallel but callbacks are impacted by overall load on servers - sometimes redirect can happen before callback and sometimes, vice versa. The best approach is to allow both redirect and callback to do the same thing, but the one arriving after first one may be ignored.
Order can have 3 statuses:
PENDING- initial status, no changes yetCONFIRMED- payment succeeded; you may now confirm the orderFAILED- payment failed, either because of negative risk decision, failure in registries or other reasons; you should offer alternative payment methods to the shopper so that he or she can finalise the order
Callbacks arrive to callbackUrl provided in the order request using HTTP POST method with the following body:
{
  "paywerkId": "{paywerkId}",
  "orderReference": "Merchant-Order-Reference-12345"
}
Paywerk has its own retry mechanism for failed callbacks. We may try a certain amount of times to send the update before stating it a failed effort. Since callbacks sometimes can fail, we insist on allowing option A and optionally using option C from step 4 as a fallback solution for knowing the latest status of the payment.
Step 5. Process the order. Based on status change received in step 4, you can either mark the order completed or, in case of failed payment, offer other payment options. The order status you should use in your own e-commerce platform depends on your own workflows. You can treat CONFIRMED status as payment done, and whatever steps may follow that (like order confirmation) is up to you.
Step 6. Fulfil the order (not applicable to Swedbank merchants at this point). Depending on whether the order was paid via Pay Now or Pay Later payment option, you may need to mark the order items as fulfilled.
- For Pay Now payment method fulfilling the order is optional, but we recommend doing it so you can have a clear overview in Paywerk's Merchant Portal which orders are not fulfilled, which are partially and which fully fulfilled.
- For Pay Later payment methods (Invoice and Slice) it is mandatory to mark order items as fulfilled in order to receive the funds for those items.
Step 7. Receive funds. Depending on parameters agreed in your contract, there can be one or two Payout Delay parameters agreed with you: one for Pay Now and one for Pay Later payment methods.
See more in Fulfilment and Settlements sections.
- For Pay Now payment method you'll receive money after X days (defined in your contract as Pay Now Payout Delay), and it doesn't matter if order is fulfilled or not.
- For Pay Later payment methods (Invoice and Slice) you'll receive money after Y days (defined in your contract as Pay Later Payout Delay) after fulfilling the order. In case an order is filled in different parts on different dates, each fulfilment part will be assigned a separate payout delay (partial fulfilment date + Y days), and you'll receive funds according to those dates.
Fulfilment can be done in various ways:
- Option A: Using Merchant Portal's user interface. Go to Orders menu, find the relevant order, click Fulfil button and select order items to be fulfilled. Note that you can fulfil each order item also partially by defining a lower quantity than the initial quantity.
- Option B: Using API, you can fulfil order items one by one using
POST /orders/{paywerkId}/fulfil. You may use this API endpoint also to fulfil all order items by sending fulfilment information about all order items in a single query. - Option C: Using API, you can fulfil the whole order using
POST /orders/{paywerkId}fulfil-all.
See also Settlements section.
There can be various reasons for refunds, such as customer returns the goods, goods were not available afterall, customer compliants etc.
Paywerk allows refunds to be performed only directly by merchants. In case the shopper turns to Paywerk in any such questions, we direct the customer to the merchant. Merchant can initiate refunds in the following ways:
- Option A: Using Merchant Portal's user interface. Go to Orders menu, find the relevant order, click Refund button and select order items to be refunded. Note that you can refund each order item also partially by defining a lower quantity than the initial quantity.
- Option B: Using API, you can refund order items one by one using
POST /orders/{paywerkId}/refund. You may use this API endpoint also to refund all order items by sending refund information about all order items in a single query. - Option C: Using API, you can refund the whole order using
POST /orders/{paywerkId}/refund-all.
Refunds are deducted from the order amounts you would receive the following settlement. See more in Settlements section.
Funds are sent as SEPA or local transactions in batches depending on your contract on a daily or weekly basis, or on certain weekdays. You'll receive not more than one settlement payment from us per day per merchant company. Please note that all Paywerk fees are deducted from the order amounts when payouts are made.
There may be also a situation where due to having more refunds and new orders on a specific day, you may need to send us funds instead of us sending you. In those cases you'll receive an automated e-mail instructing where to make the payment and in which amount.
You can get a better understanding of the transactions in Merchant Portal under Transactions menu. You can also see any relevant transactions per order when you go to Orders menu and find a specific order.
⭐ Order request
In checkout, in order to display the detailed payment option, you need to send us an order request. As a response you will receive a Paywerk ID which allowes to display inline content.
Authorizations:
Request Body schema: application/json
| lang required | string Language code according to ISO 639-1 standard (2 lowercase letters). Allowed values: |
| firstName | string First/given name(s) of the shopper. |
| lastName | string Family/last name(s) of the shopper. |
string E-mail address of the shopper. Has to be in a valid | |
| phone | string Phone number of the shopper formatted in the International E.164 standard, starting with plus (+) symbol. In case multiple phone numbers are known, prefer the main mobile number. |
| personalCode | string Personal identification number according to local format |
required | object (Address) Shopper's billing address country is mandatory and is the minimal address data you must send. Please note that the payment process depends on billing address country. Adding delivery address (when applicable) is optional. |
object (Address) Shopper's billing address country is mandatory and is the minimal address data you must send. Please note that the payment process depends on billing address country. Adding delivery address (when applicable) is optional. | |
| amount required | number Total purchase amount that needs to be paid by the shopper, including but not limited to any taxes, fees, delivery costs, discounts, coupons used, etc. May include up to 2 decimal places (decimal separator |
| currency required | string Currency of the purchase in ISO 4217 format (3 uppercase letters). Allowed values: |
| successUrl required | string <uri> URL where to redirect the shopper after successful payment process. |
| failedUrl required | string <uri> URL where to redirect the shopper after unsuccessful payment process. |
| callbackUrl | string <uri> URL where to send server-to-server callback requests about status changes. |
| reference required | string Unique order number on merchant side. When sending updates of the same shopping cart or shopper info, you can use same |
Array of objects (OrderRequestItem) Shopping cart rows, i.e., items in the shopping cart. In case sending the full information on shopping cart rows is not possible or difficult, you may sum up all items as one item row. To provide the best shopper experience, we highly recommend providing full list of items in the cart. When no order items are sent, Paywerk adds a summarising item covering full amount of the order, on its own. Important: The items list of only for informative purposes and will not be changed throughout the lifecycle of the order. For example, when making refunds, you cannot refer to a specific item but just total amount to be refunded. | |
| displayedProductTypes | Array of arrays Items Enum: "INVOICE" "SLICE" "PAY_NOW_CARD" If set, displays only selected Paywerk product types and only if they are added to your contract. If not set, does not limit product types displayed as payment methods. |
object (ShopMetadata) Merchant integration information, e.g., plugin/extension name and version. May help with locating errors and bugs on merchant side. |
Responses
Request samples
- Payload
{- "lang": "en",
- "firstName": "Jane",
- "lastName": "Doe",
- "email": "jane.doe@domain.com",
- "phone": "+37255555555",
- "personalCode": "34501234215",
- "billingAddress": {
- "countryCode": "EE",
- "postalCode": "12345",
- "region": "Harjumaa",
- "city": "Tallinn",
- "street": "Example Street",
- "apartment": "123"
}, - "deliveryAddress": {
- "countryCode": "EE",
- "postalCode": "12345",
- "region": "Harjumaa",
- "city": "Tallinn",
- "street": "Example Street",
- "apartment": "123"
}, - "amount": 1238.16,
- "currency": "EUR",
- "reference": "W-1234567",
- "items": [
- {
- "name": "Electric bicycle X-4000",
- "sku": "493579_red",
- "unitPrice": 1238.99,
- "quantity": 1,
- "type": "PHYSICAL",
- "category": "Electric bicycles"
}
], - "displayedProductTypes": [
- "SLICE"
], - "metadata": {
- "shopPlatform": "WooCommerce",
- "platformVersion": "6.0.1",
- "pluginVersion": "1.0.1"
}
}Response samples
- 200
{- "paywerkId": "string",
- "isComplete": true
}Fetch order details
Authorizations:
path Parameters
| paywerkId required | string |
Responses
Response samples
- 200
{- "paywerkId": "string",
- "status": "PENDING",
- "createdAt": "2019-08-24T14:15:22Z",
- "initialAmount": 0,
- "amount": 0,
- "currency": "string",
- "reference": "string",
- "items": [
- {
- "name": "string",
- "sku": "string",
- "unitPrice": 0,
- "quantity": 0,
- "type": "PHYSICAL",
- "category": "string"
}
], - "shopper": {
- "firstName": "string",
- "lastName": "string",
- "email": "string",
- "phone": "string",
- "personalCode": "string",
- "language": "string"
}, - "billingAddress": {
- "countryCode": "EE",
- "postalCode": "12345",
- "region": "Harjumaa",
- "city": "Tallinn",
- "street": "Example Street",
- "apartment": "123"
}, - "deliveryAddress": {
- "countryCode": "EE",
- "postalCode": "12345",
- "region": "Harjumaa",
- "city": "Tallinn",
- "street": "Example Street",
- "apartment": "123"
}
}Fetch order details by merchant reference
Authorizations:
path Parameters
| reference required | string |
Responses
Response samples
- 200
{- "paywerkId": "string",
- "status": "PENDING",
- "createdAt": "2019-08-24T14:15:22Z",
- "initialAmount": 0,
- "amount": 0,
- "currency": "string",
- "reference": "string",
- "items": [
- {
- "name": "string",
- "sku": "string",
- "unitPrice": 0,
- "quantity": 0,
- "type": "PHYSICAL",
- "category": "string"
}
], - "shopper": {
- "firstName": "string",
- "lastName": "string",
- "email": "string",
- "phone": "string",
- "personalCode": "string",
- "language": "string"
}, - "billingAddress": {
- "countryCode": "EE",
- "postalCode": "12345",
- "region": "Harjumaa",
- "city": "Tallinn",
- "street": "Example Street",
- "apartment": "123"
}, - "deliveryAddress": {
- "countryCode": "EE",
- "postalCode": "12345",
- "region": "Harjumaa",
- "city": "Tallinn",
- "street": "Example Street",
- "apartment": "123"
}
}Payment schedule by product type
In case you would like to show shoppers promotion of Pay Later payment methods, use this endpoint to get the payment schedule and then display it accordingly. E.g. Pay 33.34 EUR today, 33.33 EUR on XX.XX.XXXX, 33.33 EUR on XX.XX.XXXX. No extra fees or interest.
Authorizations:
path Parameters
| productType required | string Enum: "INVOICE" "SLICE" "PAY_NOW_CARD" Product type for which the payment schedule is queried. In case multiple products of the same type are available for the merchant, this endpoint uses the standard default product for that country. |
query Parameters
| amount required | number Total product or purchase amount that needs to be paid by the shopper, including but not limited to any taxes, fees, delivery costs, discounts, coupons used, etc. May include up to 2 decimal places (decimal separator |
| shopperCountryCode | string Country code in ISO 3166-1 alpha-2 format (2 uppercase letters). Use shopper billing country here. If set, takes the default standard product for that country. If not set, the country is set to merchant country. |
Responses
Response samples
- 200
{- "productId": "string",
- "productType": "INVOICE",
- "schedule": [
- {
- "seqNumber": 0,
- "date": "2019-08-24",
- "amount": 0,
- "currency": {
- "currencyCode": "string",
- "defaultFractionDigits": 0,
- "numericCode": 0,
- "displayName": "string",
- "symbol": "string",
- "numericCodeAsString": "string"
}
}
]
}Payment schedule by product ID
In case you would like to show shoppers promotion of Pay Later payment methods, use this endpoint to get the payment schedule and then display it accordingly. E.g. Pay 33.34 EUR today, 33.33 EUR on XX.XX.XXXX, 33.33 EUR on XX.XX.XXXX. No extra fees or interest.
Authorizations:
query Parameters
| productId required | string Product ID for which the payment schedule is queried (ask ID from Paywerk). |
| amount required | number Total product or purchase amount that needs to be paid by the shopper, including but not limited to any taxes, fees, delivery costs, discounts, coupons used, etc. May include up to 2 decimal places (decimal separator |
| shopperCountryCode | string Country code in ISO 3166-1 alpha-2 format (2 uppercase letters). Use shopper billing country here. If set, takes the default standard product for that country. If not set, the country is set to merchant country. |
Responses
Response samples
- 200
{- "productId": "string",
- "productType": "INVOICE",
- "schedule": [
- {
- "seqNumber": 0,
- "date": "2019-08-24",
- "amount": 0,
- "currency": {
- "currencyCode": "string",
- "defaultFractionDigits": 0,
- "numericCode": 0,
- "displayName": "string",
- "symbol": "string",
- "numericCodeAsString": "string"
}
}
]
}Promote Pay Later right on your product page with the promotion widget. You can show customers that they can pay in parts with Paywerk, increasing your website’s conversion rate.
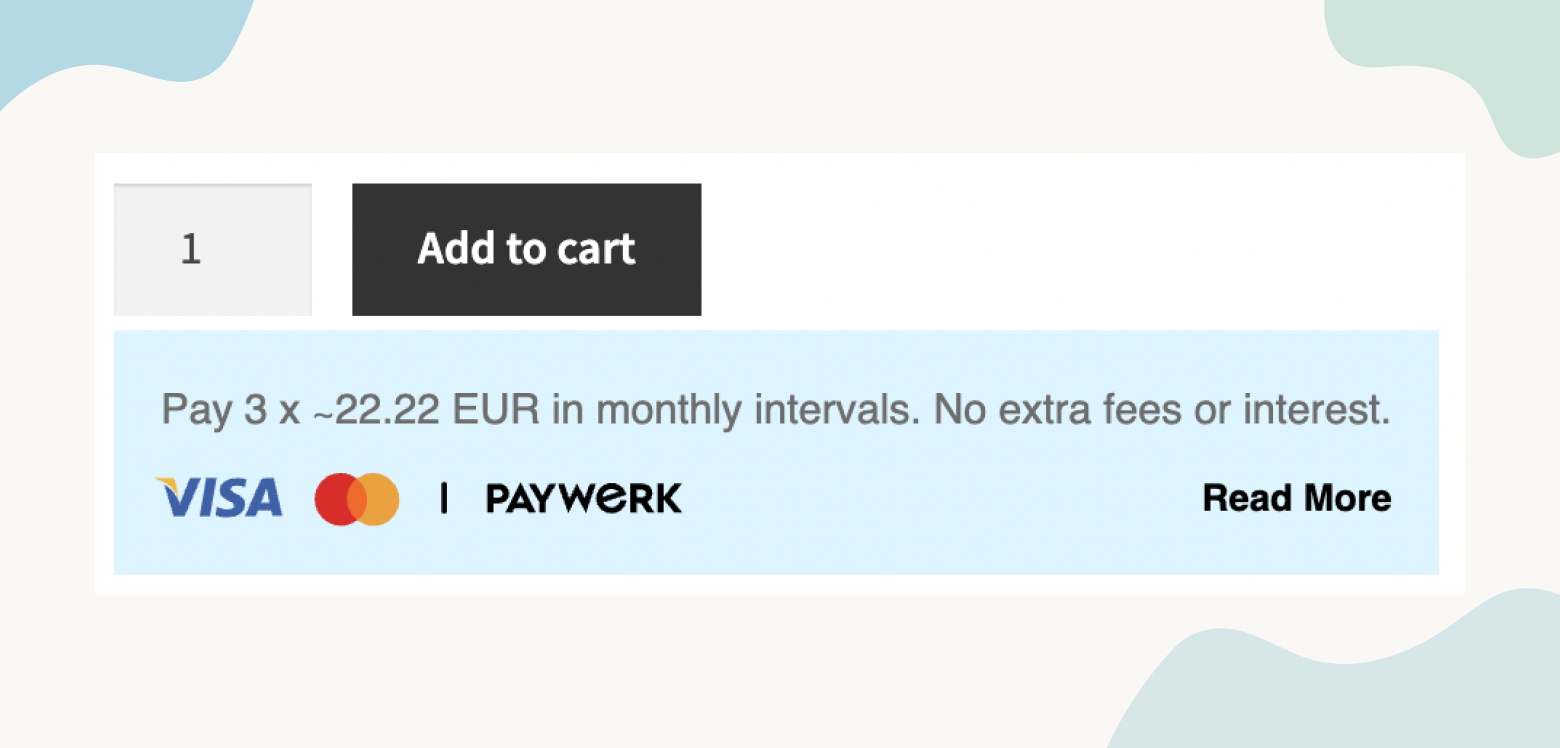
The promotion block includes a link to an explanation about Paywerk’s payment method, so that they can learn how to use it. To add the promotion widget to your website, make sure you have the latest plugin from Paywerk, and review its settings according to the instructions above.
Promotions are currently available on WooCommerce. To get the widgets, follow the instructions below.
- WooCommerce - check step 5